
Word count: 5421
This reflective report covers my critical analysis of the development of my work during a negotiated design placement.
The main purpose of this project was to gain experience and apply our new knowledge to extending our understanding of
developing innovative media on different platforms.
Due to my success in the second-year client projects, I was able to acquire a placement with the same client on the Tomebound project.
Second year client projects can be viewed here.
The following reflective report demonstrates a host of new skills and experience gained during a ten-week work placement, including a variety of different design tasks focused on shaders and visual effects in Unity. The development each piece of work will be explained, and a personal critical analysis will be included that will explore skills that I improved and weaker skills that need some additional development.
Sustainable development goal 12 states ensure sustainable consumption and production patterns (The Global Goals, 2021). During this project we have ensured that our development processes encounter no ethical conflicts while avoiding any potential harm to different cultures and communities.
The project was efficiently managed using a Trello board, providing a clear visual workflow with several groups of cards displaying different tasks. A timeline was included, that split the course of the project into two-week long sprints, each having a different set of goals. Each task was clearly labelled and managed into columns according to its priority, the type of work required, and the individual assigned to that task. This in conjunction with weekly project meetings allowed the board to reflect real-time project developments, making it a beneficial tool for tracking group and individual task deadlines.

The Gannt chart above shows the list of sprints and tasks, the expected completion date of each and whether I was able to reach the deadline or if the task was extended. To briefly summarise, I believe that I have seen major improvements in my time management during this project and having tools like this Gannt chart and specific deadlines to work towards, are the primary factors contributing to my improvement in this skill.
My first sprint goal was to create a new lava shader and accompanying particles and visual effects. At this time, I had little experience with Unity shaders, so I took a moment to educate myself on the basics. I discovered a video tutorial on YouTube (Daniel Ilett, 2021), that I found myself referring to at many points during the project, as it provided to be a useful tool that described the purpose and examples of each different node in Unity shader graph.
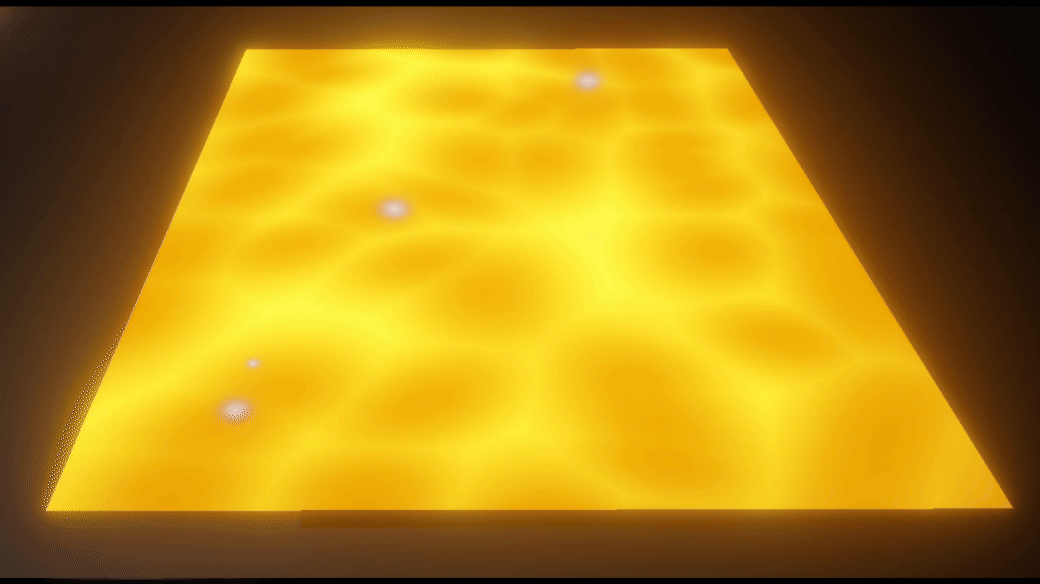
My aim for the lava shader was to create a varying flow of lava cells that have fluid movement and morph around other cells they meet. To achieve this, I started with using a Voronoi node, which is a type of noise node that created a cell-based pattern.
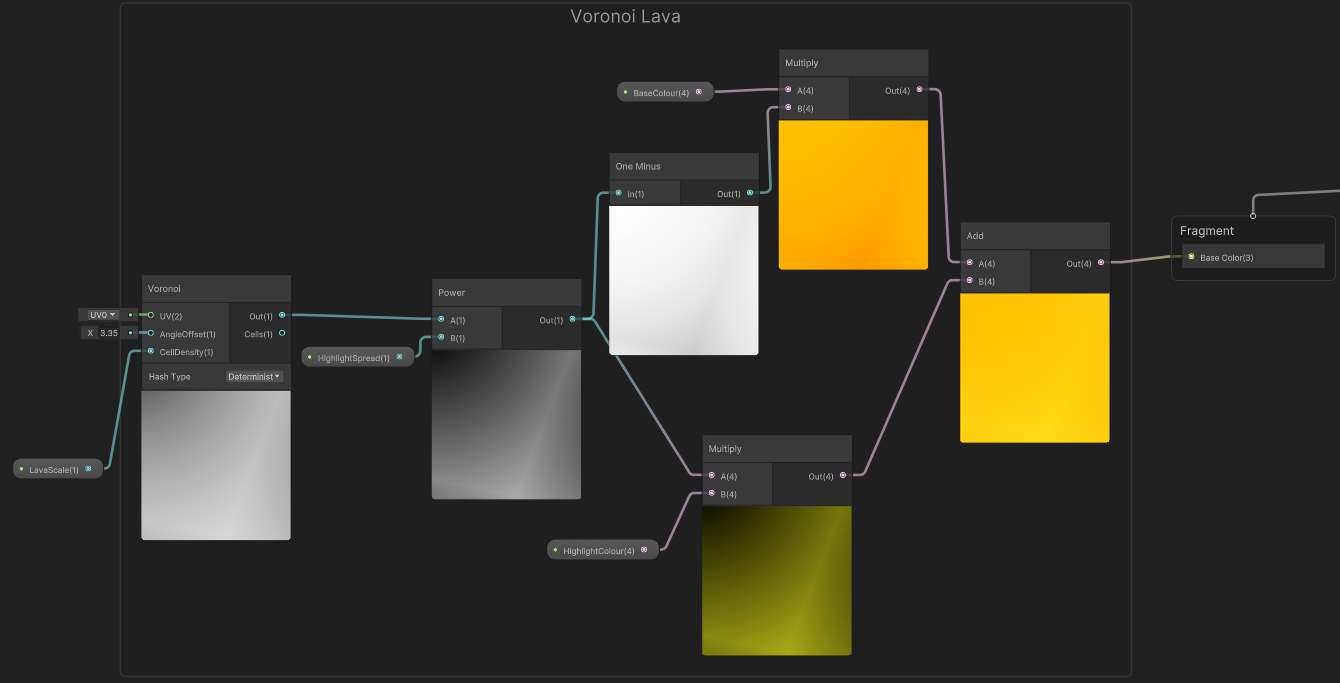
The cell density input on the Voronoi node can be directly changed with a float property, to apply a different scale to the cells. This was then input to a power node with a second float to control the scale of the highlights that bridge between each cell. To control the highlight colour, the power node is multiplied with a colour property. To control the cell colour, a one minus node is used to flip the mask, allowing the cells to be multiplied with another colour property.
To make the lava flow, I used a time node that was multiplied with a float that represented the speed of the lava flow.
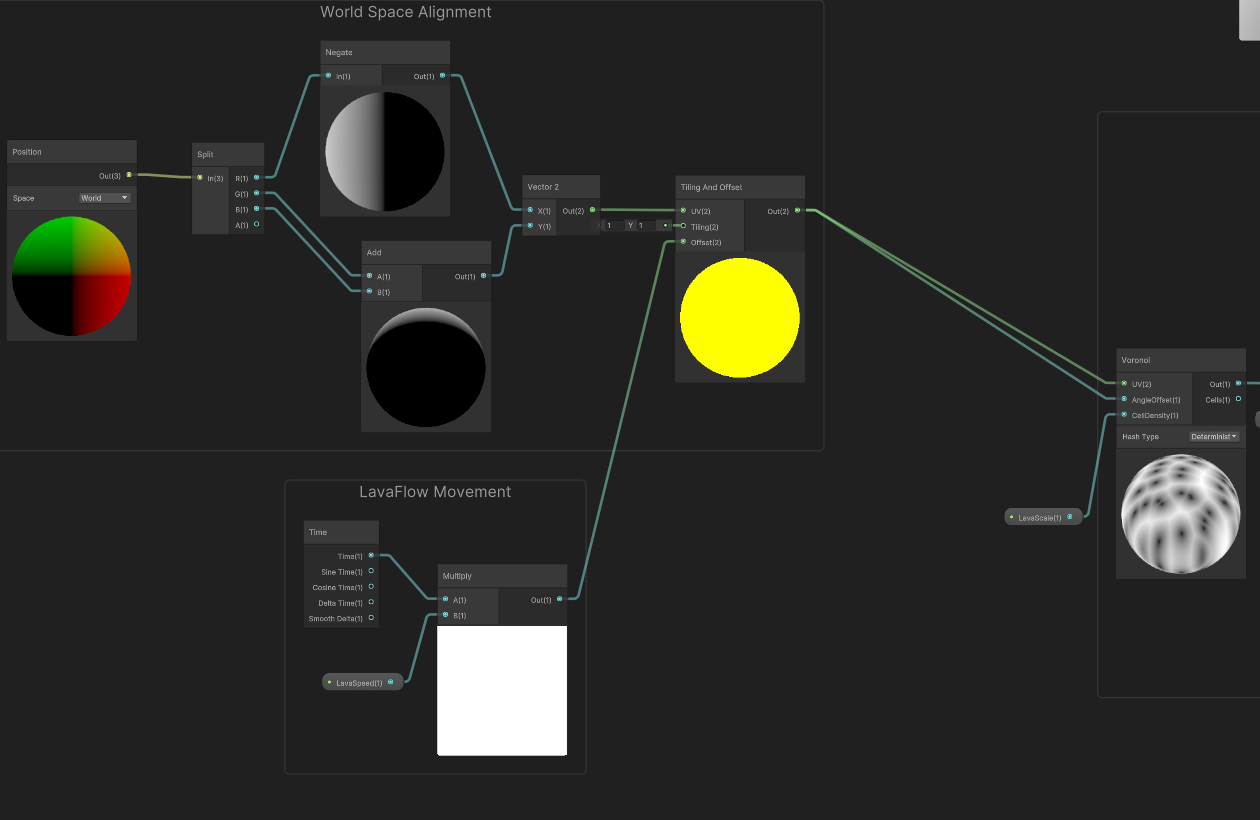
I also used a world space position node connected to the UV input of the tiling and offset node. This allows the lava material to line up on multiple planes placed next to each other.
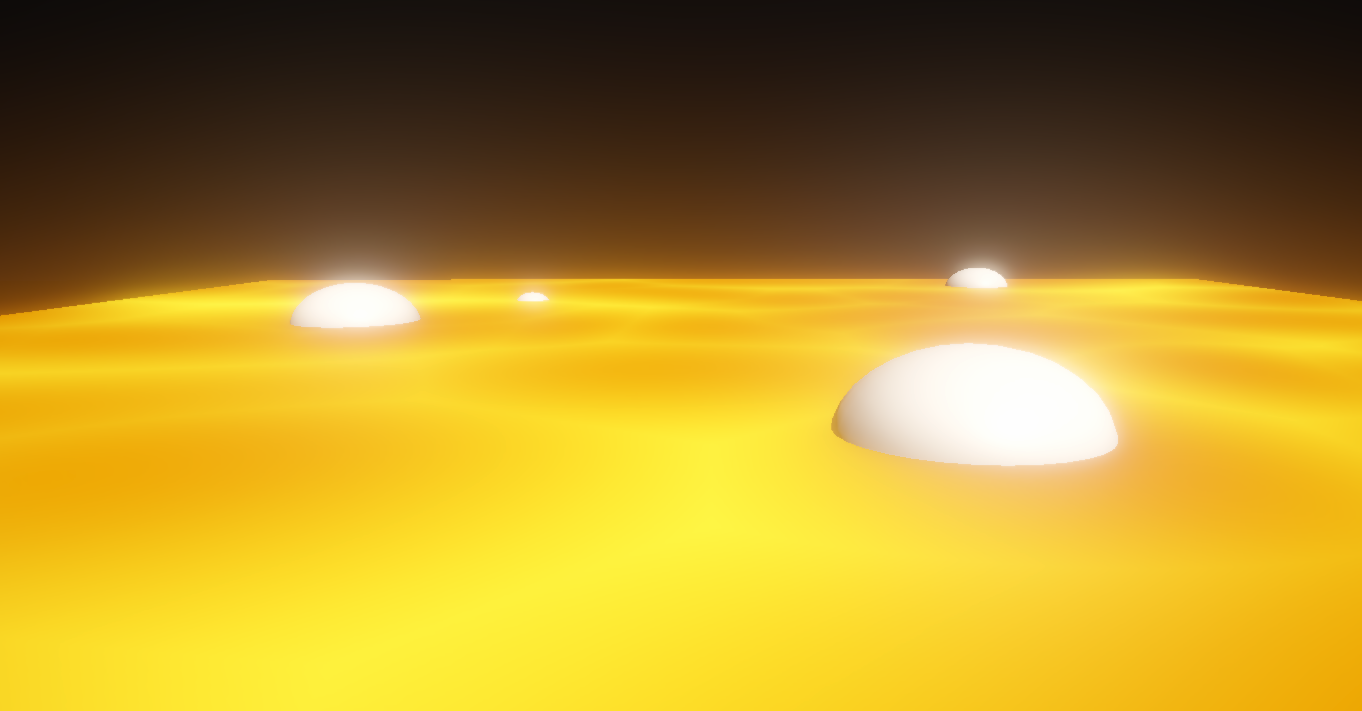
The secondary stage to the brief was to create additional idle effects. Popping bubbles are a staple for stylised video game lava, so I made this my new task. I created a particle system to achieve this effect, and started by implementing the basic features I would need. This included using the size over life property to create an inflating effect. The particles would emit from the lava plane mesh on a random vertex to avoid any predictable patterns from occurring. Each particle also has a random lifetime between two values to avoid any two bubbles from popping at the same time.
In this state, they were using the generic Unity particle material, so they needed a new bubble material. I had previously found a cartoon bubble shader in a twitter post (@Cyanilux, 2019) and I used this as a reference guideline for the design of the bubbles. I used the standard Unity sphere renderer as the particle mesh and slightly shrunk the vertical scale to make the bubble flatter.
Next, I created a second shader for a stylised bubble material.
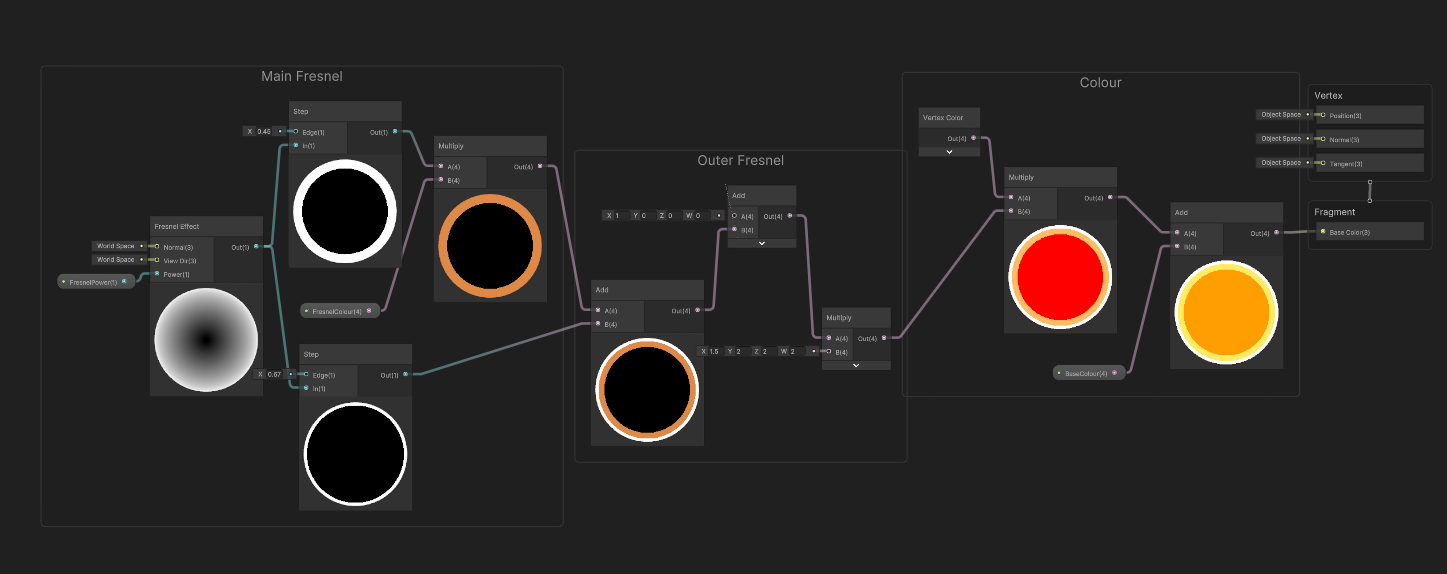
This shader graph used a Fresnel node, connected to a step node to create a block outline, which is then multiplied with a colour property for the outline colour. The outputs of these nodes are added and multiplied with a set of specific values, which is then further multiplied with a vertex quad node. This is then combined with a colour property which controls the base colour of the bubble.
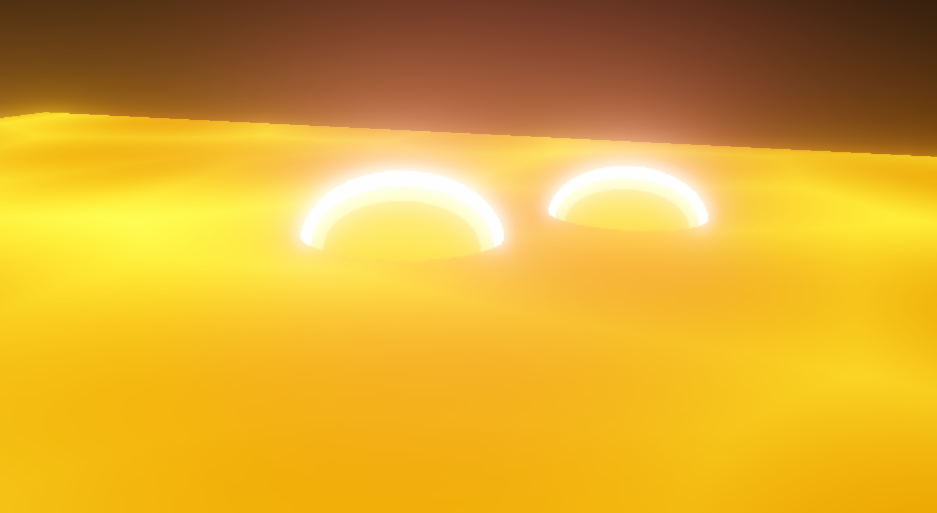
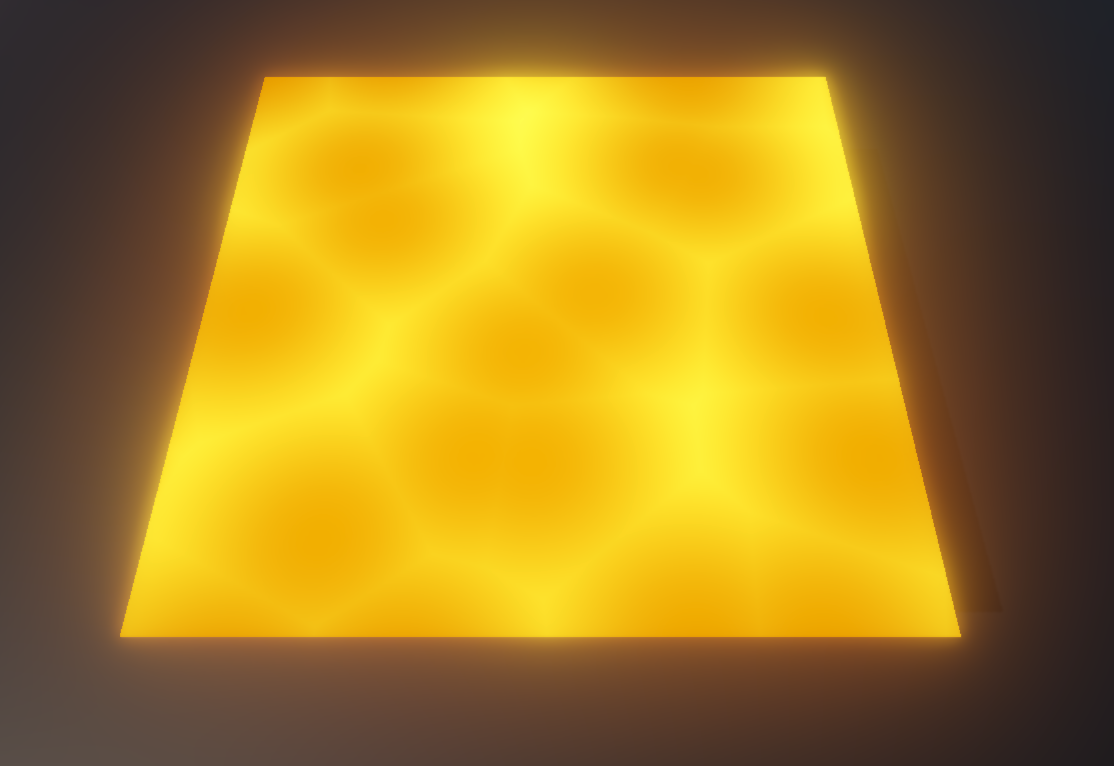
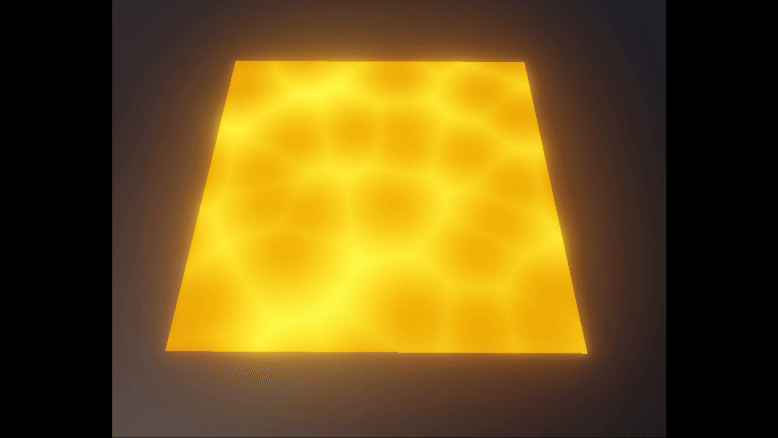
The final addition involved using sub emitters in the particle system. This created a single burst of billboard particles to emit from each bubble at the end of their lifetime, creating a popping effect. After our first sprint meeting and gaining successful feedback on my work, some additional changes were made to the shader and particle system by the client to create the finished lava tiles.
This task was a great introduction to shaders and particles because I was able to experiment with a variety of shader nodes and how they could interact with each other. I also learnt the basics of particle systems, including controlling their appearance with parameters like velocity and size over lifetime. I believe that in this first sprint, I was successful at meeting the needs of the client and I am eager to see further developments in this task such as accompanying sound design, creating a more immersive environment.
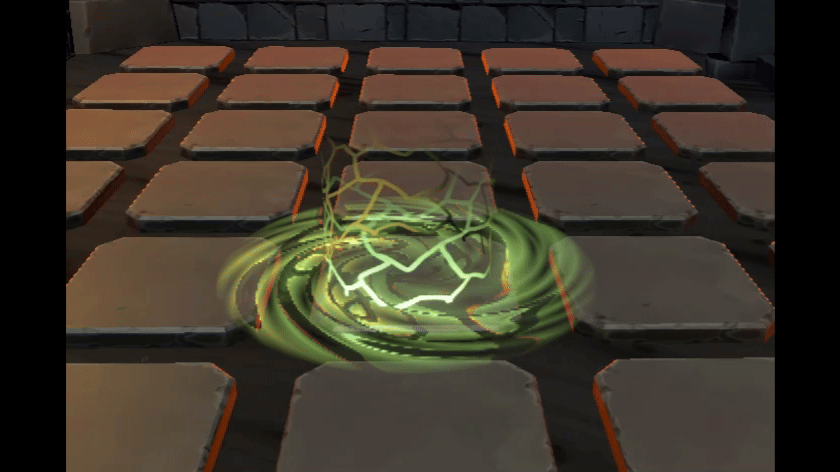
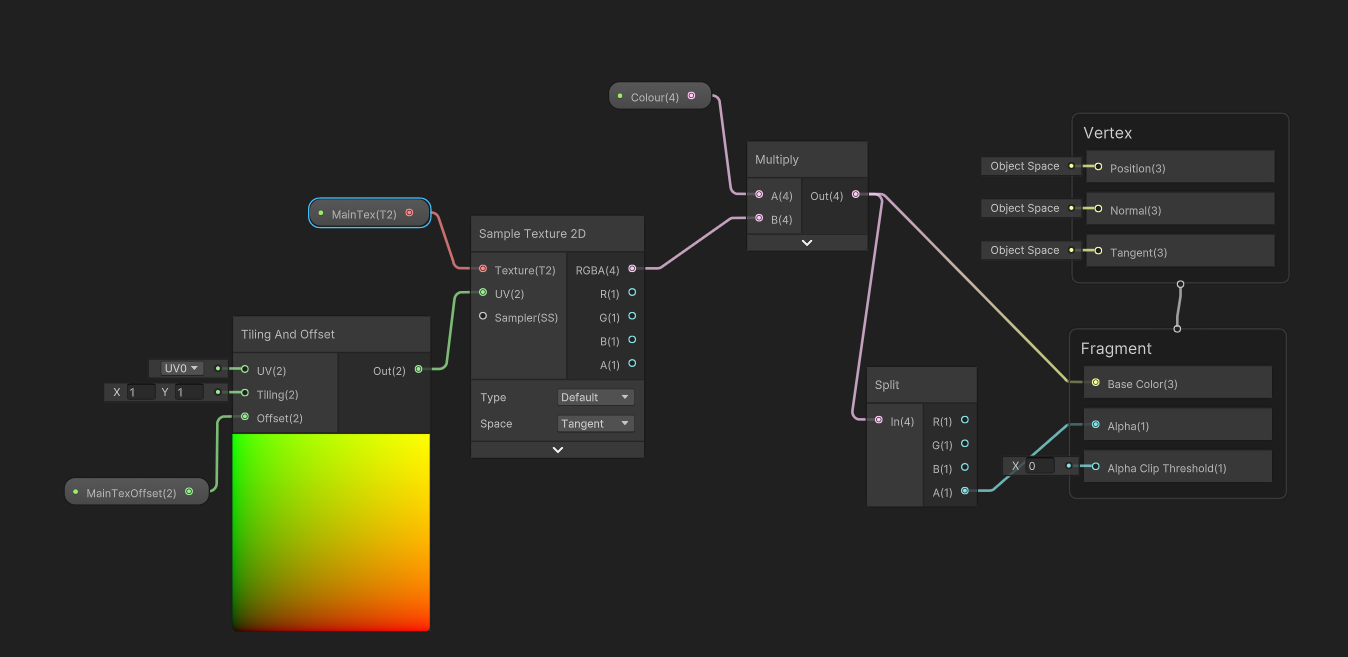
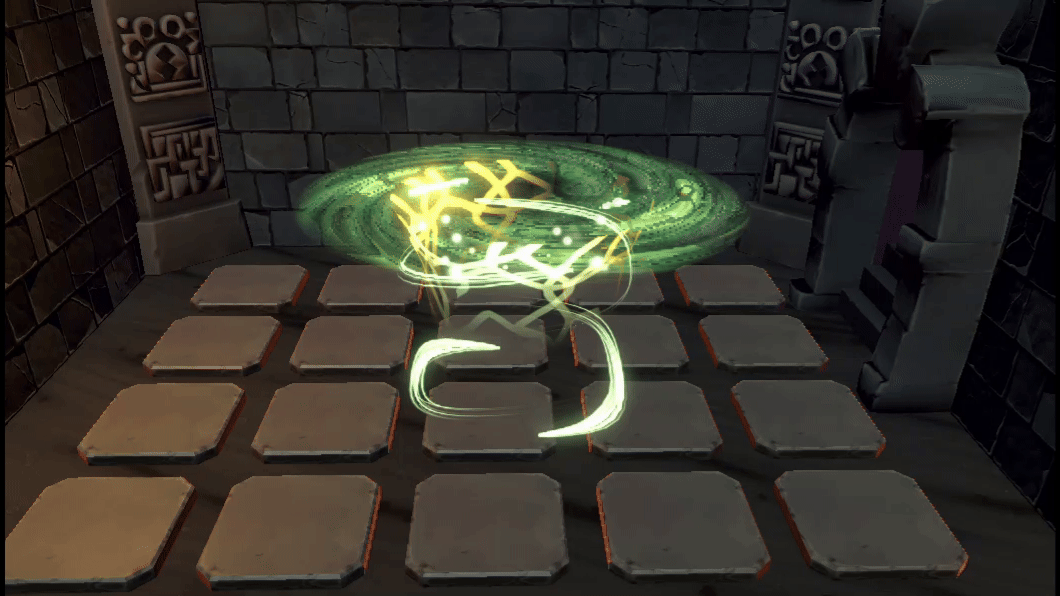
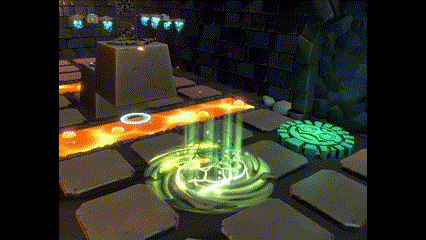
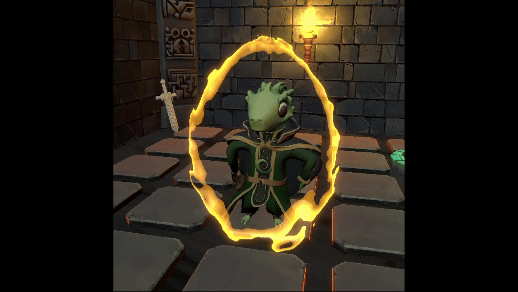
My second task was to create updated visuals for the portal ability, which is used by one of the playable characters to move objects throughout the level. A portal entrance and exit were needed with different particles and effects to accompany them. The client provided some references and inspiration to work with, including the rift visuals in Fortnite (Fortnite, 2017). In this task I used Unity's visual effect graph for the first time, so I prepared by reading tough a VFX graph introduction tutorial on Unity Learn (Unity Learn, 2018). which explained different features and nodes in visual effects, which turned out to be similar to shader graph.
I started with creating two different portal designs based on the references provided and presented them for feedback.
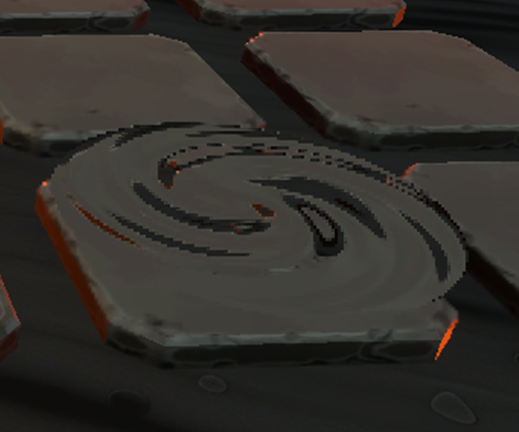
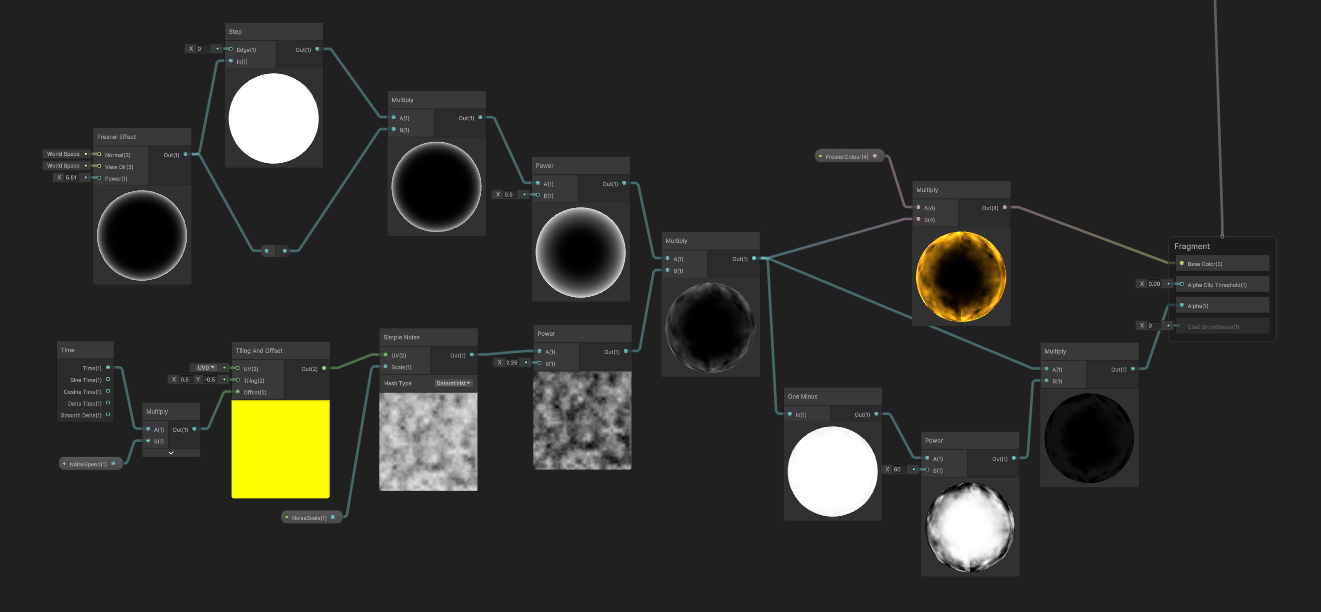
The first design was a transparent distortion effect. This was made in a lit shader graph as I needed to use alpha clipping.
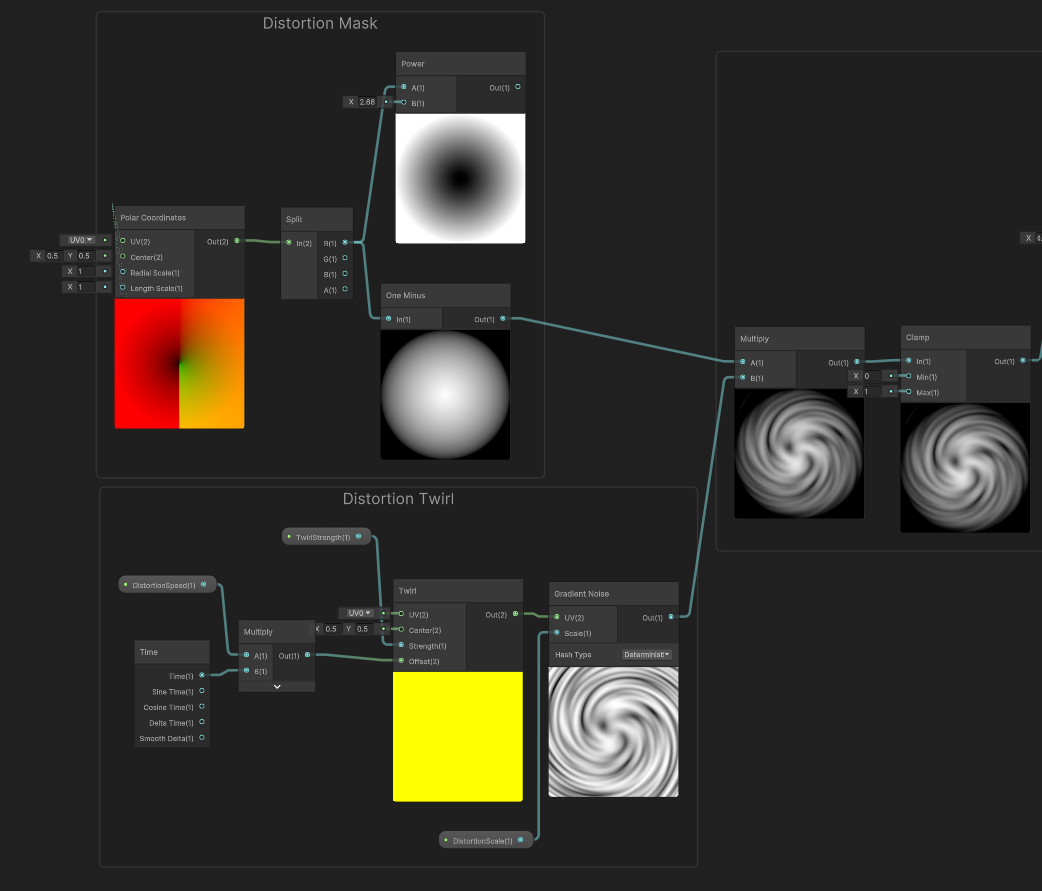
This graph used a Twirl UV node with a gradient noise to create a twirl appearance. Before this, I multiplied a time node with a float which controls the speed of the twirl movement, by manipulating the offset value of the twirl UV. The portal needed to be a circular shape, so I created a mask to remove the outer pixels. This involved using a polar coordinate UV node which is split so the X value can be connected to a one minus node, creating a circular mask.
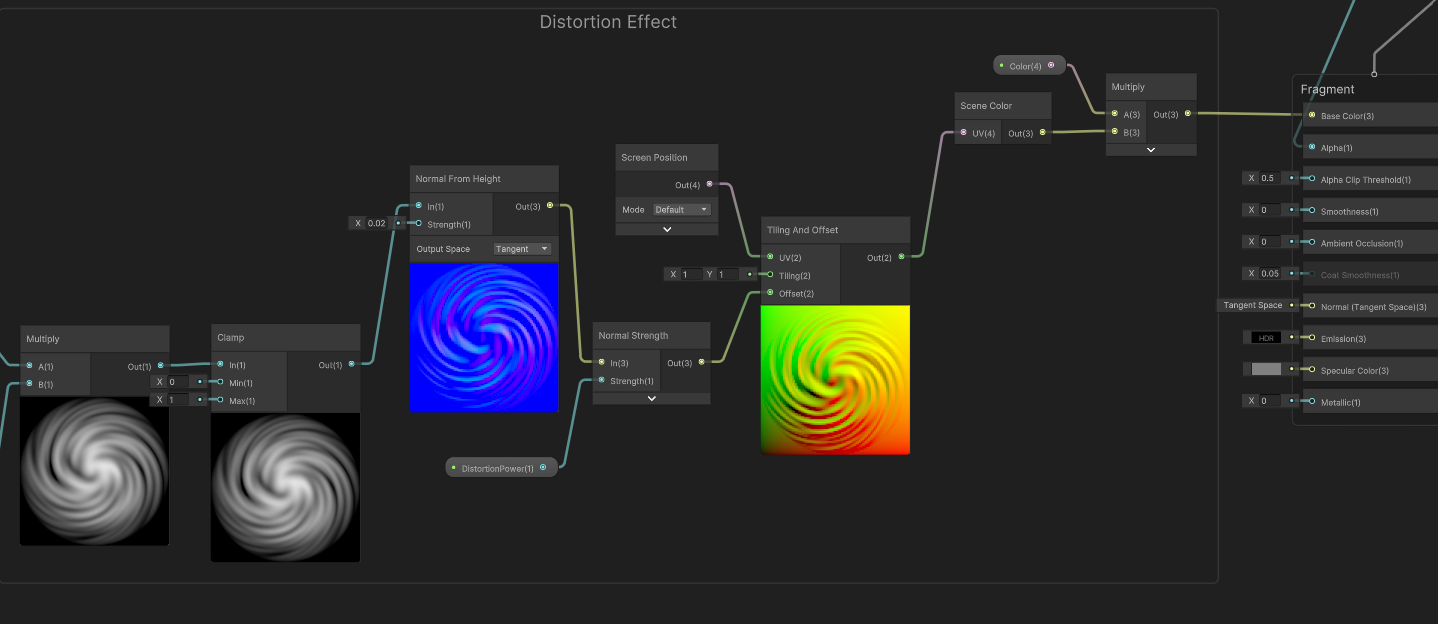
To create the transparent distortion, I used a normal from height and normal strength node. This creates a normal map and manipulates the object's normal points to make them appear less flat, creating a distortion effect.
The second portal design used a similar mask and twirl setup, but instead of using normal and screen nodes to create a distortion effect, the noise is multiplied with a standard base colour property.
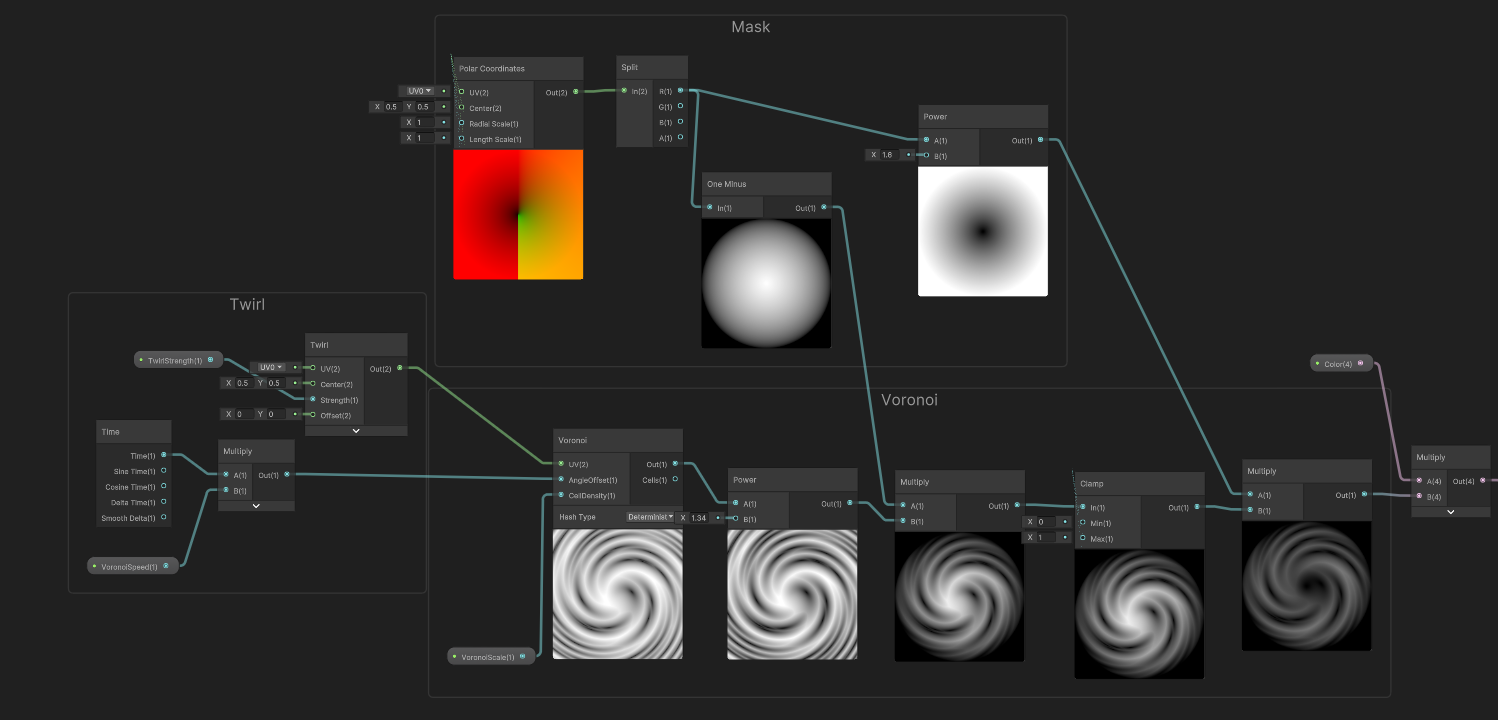
After presenting these designs to the client, I was given feedback to join the two shaders to create a coloured distortion with additional elements and particles.
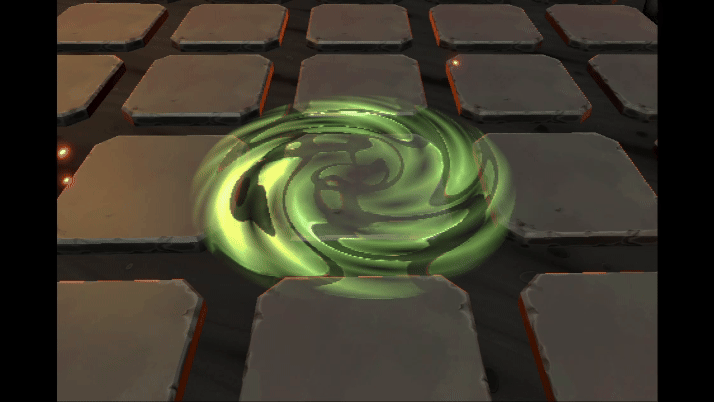
Above is the two shaders combined with a green colour to match the design of the character.
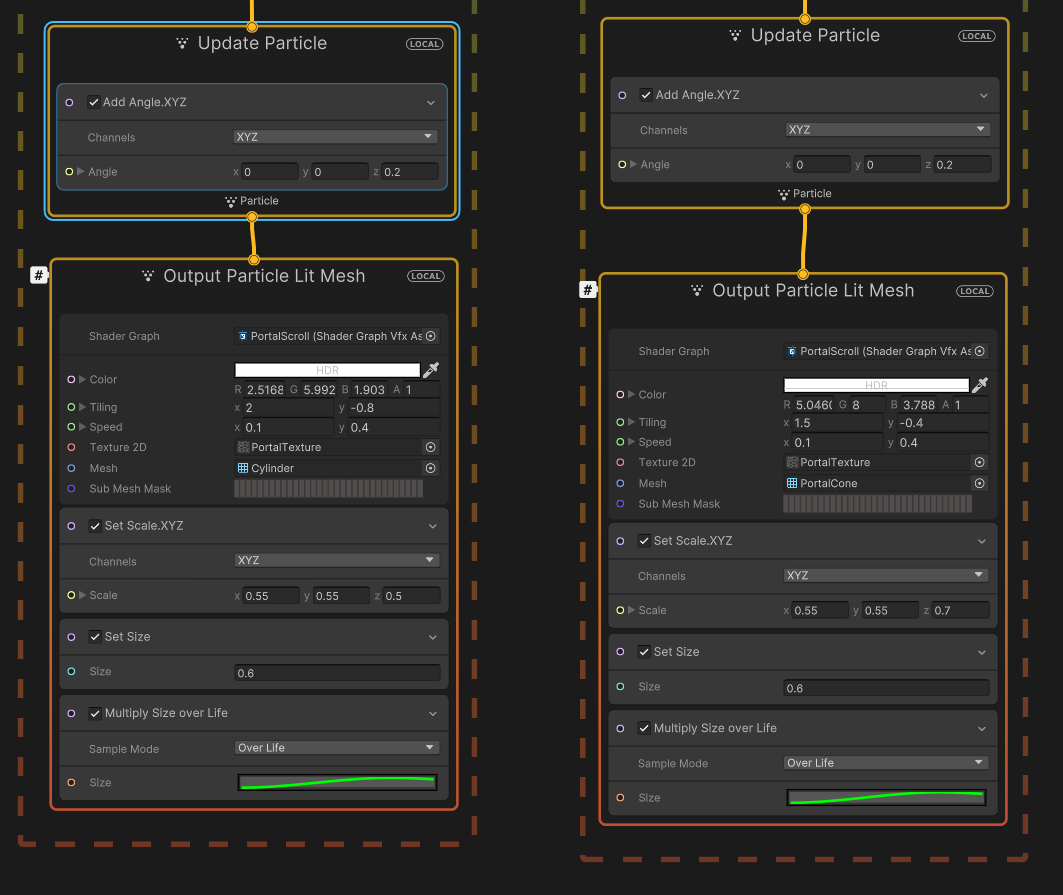
I used a VFX graph to create the rest of the portal effects, as there were going to be several layers to the portal, and it would be easier to control additional parameters.
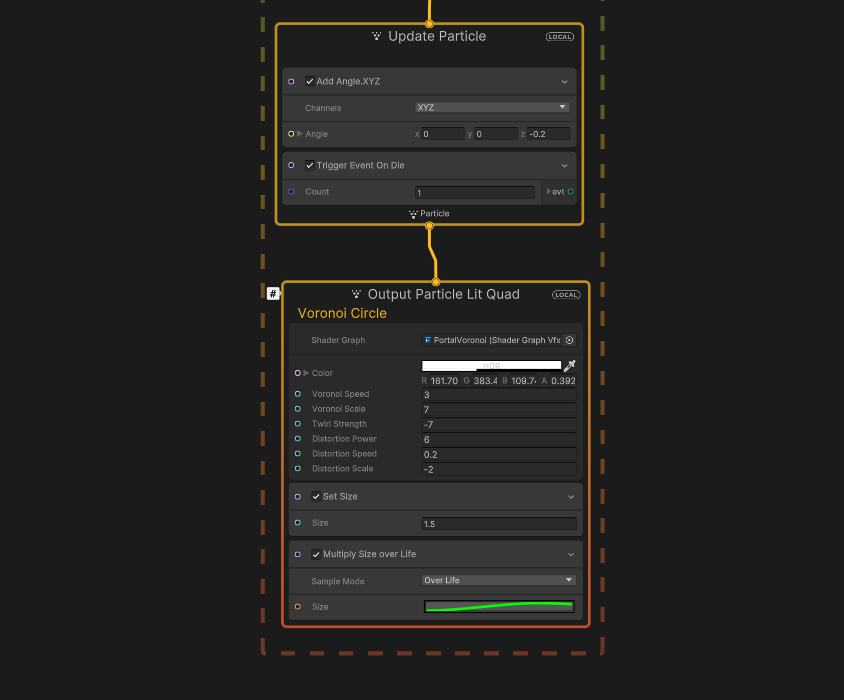
The shader already created a spiral movement, but I wanted to add additional rotation, so I included an add angle node in the update particle section, rotating the particle quad at a specified rate.
Next, I created additional layers to the portal to add some verticality. I created a repeating texture in Photoshop with a jagged tile appearance.
I placed this texture into a new shader and created a simple scrolling effect using a time node and a float to control the speed. I also created a mask that would fade out and remove pixels in the upper area of the material.

I created a simple cylinder mesh in Blender with the top and bottom face removed so when the scrolling material would be applied, it would only appear on the side faces on the cylinder.
I applied this new material to the cylinder and created a new mesh particle output in the VFX graph to display the cylinder on top of the base portal. I included the same add angle feature to make the cylinder follow the rotation of the portal.
I added a second vertical layer, using the same features but this time using a sloped cone shape to make the connection between the base and vertical parts of the portal less angled.
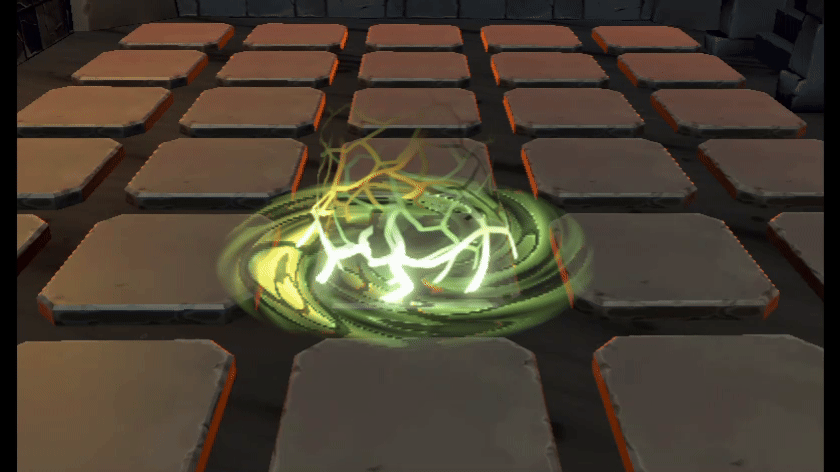
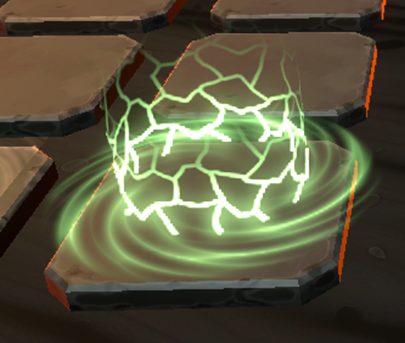
The next step was creating additional particles to add to the portal visuals. The portal had started to adopt a magical appearance, so I wanted to include similar green firefly particles to rotate around the portal.
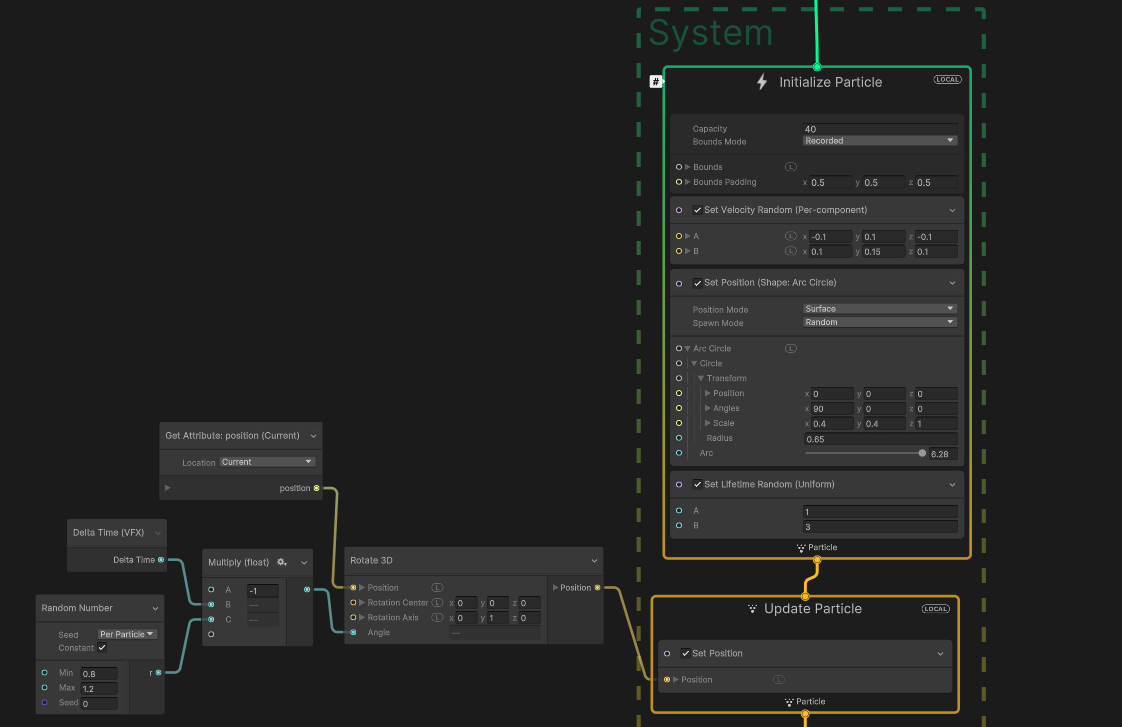
In the initialise particle block, I gave the particles a random velocity and lifetime value as well as defining the emitter shape as an arc circle to match the generic shape of the portal. To make the particles follow the direction of rotation, I simply changed the Y value of the rotation axis in a rotate 3D node to match the rotation of the portal.
Next, I multiplied a delta time node with a random number and connected this output into the angle input of the rotate 3D node. This meant that each particle would follow a slightly different angle during their rotation.

To add some final touches to the particles I gave each a random size and used an animation curve with an upward slope to increase the size of each particle over their lifetime. I combined this with a colour over lifetime gradient, that featured a fully transparent colour at both ends of the gradient, which caused the particles to fade in as they spawned and fade out as they died.
The last effect I added was a simple god ray particle system. I followed a tutorial, provided to me during feedback, on Reddit (@Secure-Application62, 2021) to achieve this.
The particle system used a cylinder emitter shape to match the portal shape, and rendered the particles as stretched billboards with a green colour applied to them.
The portal needed an exit for objects to appear from, so I took the same design and flipped the rotation to make it appear like the portal was descending from the ceiling. I wanted to include an extra effect, so I created some long wisps to flow down the portal as objects were being pushed through.
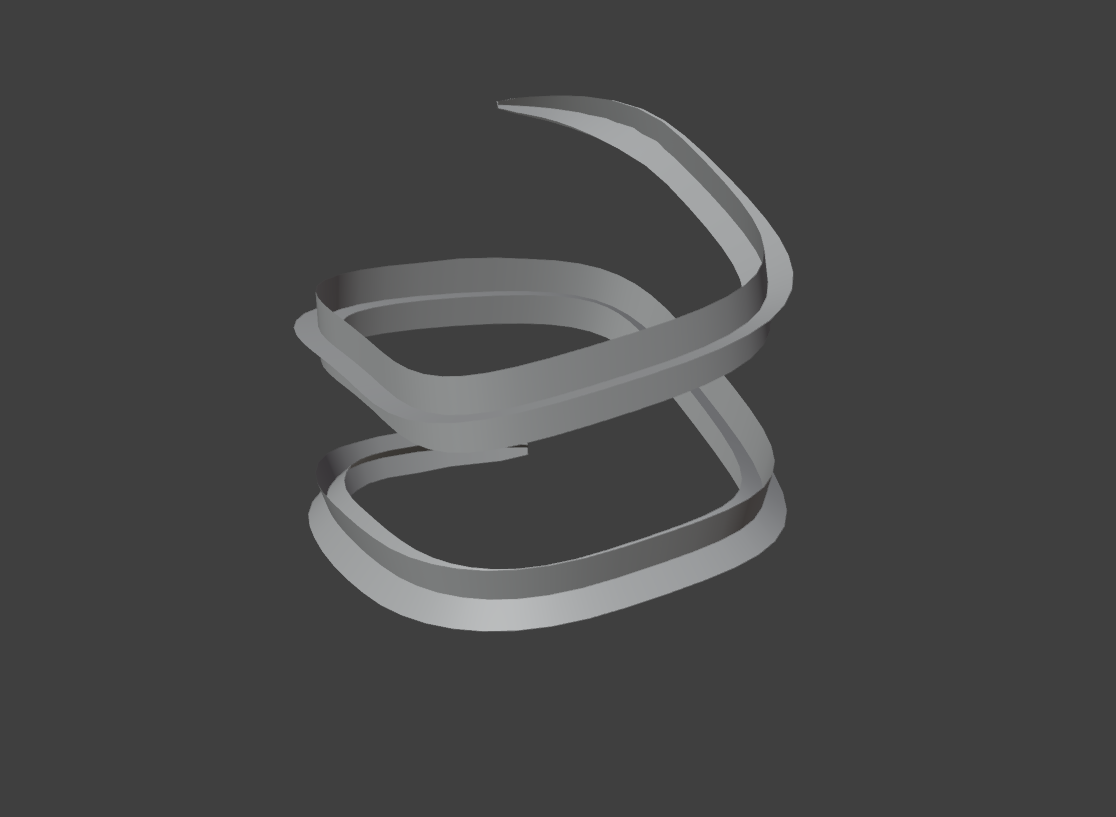
I started by modelling a spiral shape by using Bezier curve in blender with a cross shape following up the whole curve.
I created a jagged texture with soft edges in photoshop, which would be used on the Bezier curve mesh to create the wisp appearance.
I plugged this texture into a basic shader graph that allowed me to control the colour of the wisps and their offset along the curve mesh. I used a vector two property to control the offset as this would important when animating the wisps movement.
Next, I set up the VFX graph, including a series of nodes that allowed the texture to animate down the wisp mesh.
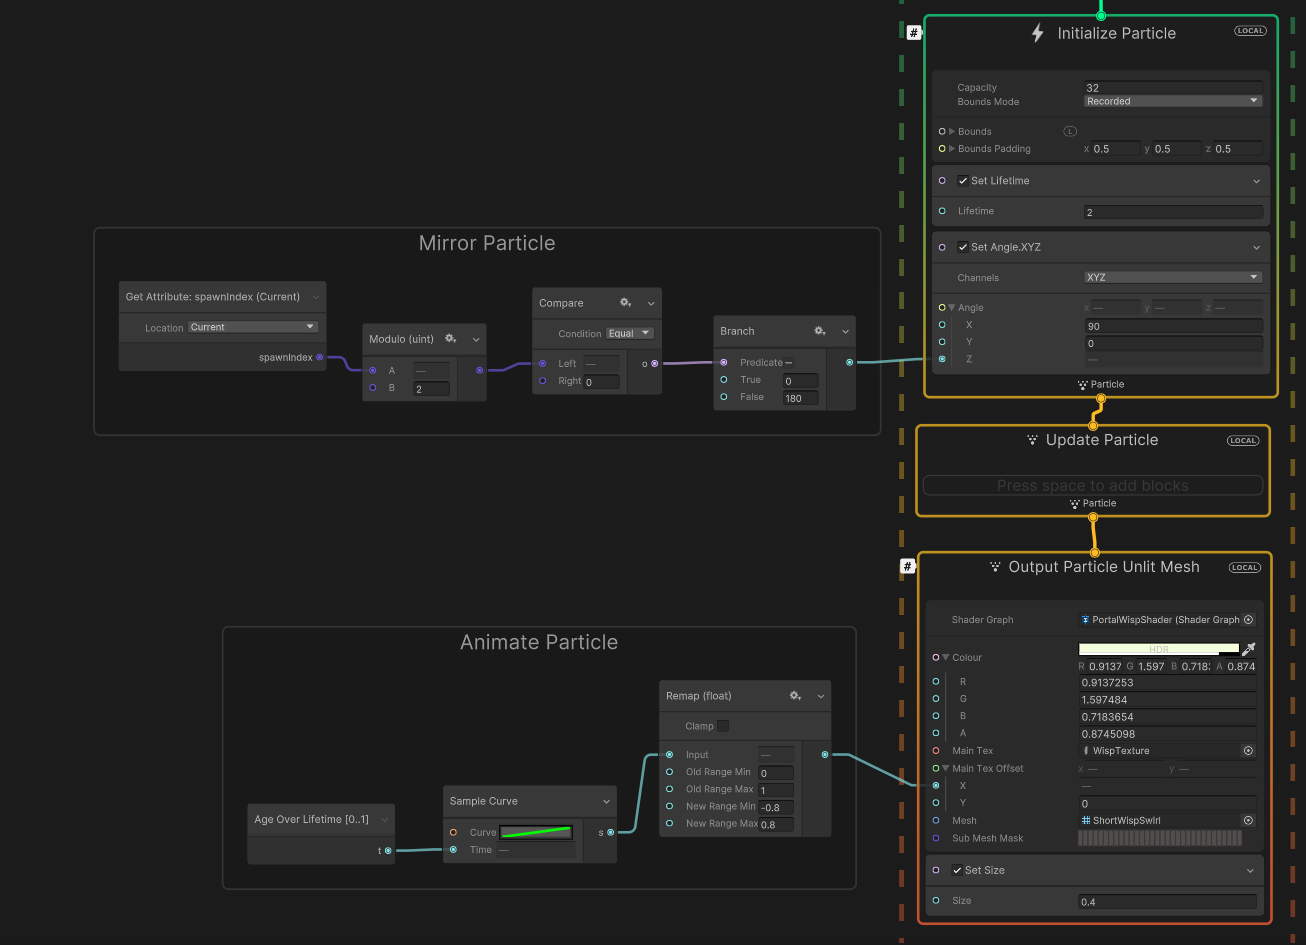
To animate the wisp particle, I used an age over lifetime node connected to an animation curve with a linear increase. I remapped this value and connected it to the X value input in the texture offset vector two property I made during the shader graph. This causes the wisp texture to animate downwards along the Bezier curve.
I also mirrored the mesh particle output to make the wisps cover a larger area around the portal.
The next addition to the portal was creating a short startup animation. This would play whenever the selected character starts to use the portal ability. To make this I added a size over life node in the output section of each mesh particle included in the portal VFX graph. This includes an animation curve that starts with a gradual slope that gets steeper and then slightly decreases towards the end of the curve.
This created a growing animation which ends with a small bounce. I set the particles, god rays and wisps to start after a short delay to match the startup time of the rest of the portal.
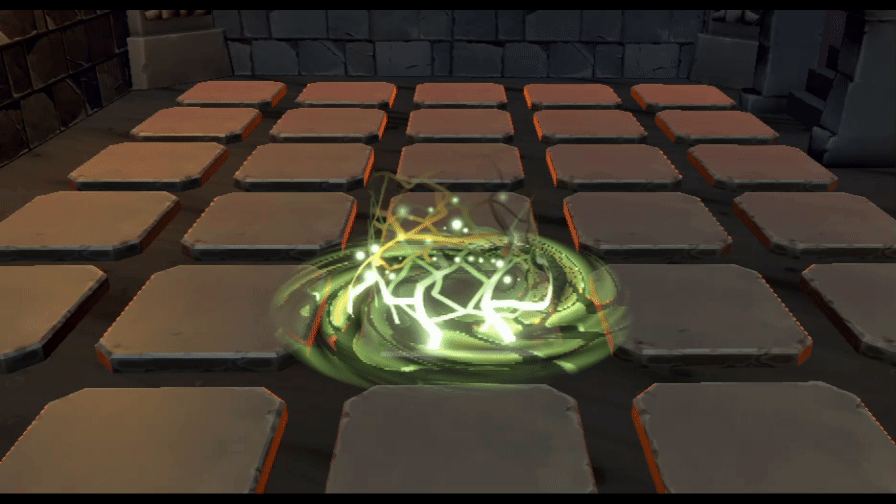
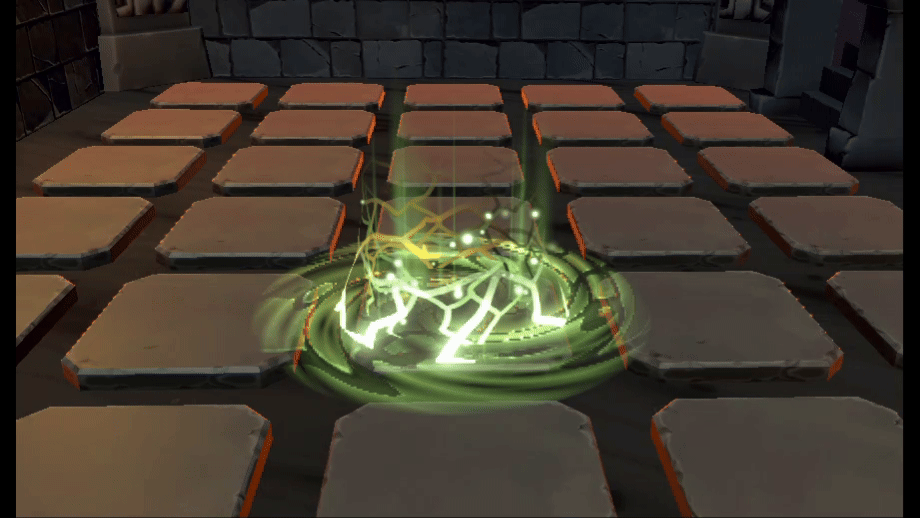
This was the final task for the sprint, and it involved creating a shader that could make objects dissolve into existence as they left the exit portal. I used a helpful YouTube tutorial from (Daniel Ilett, 2020) to aid me in this task.
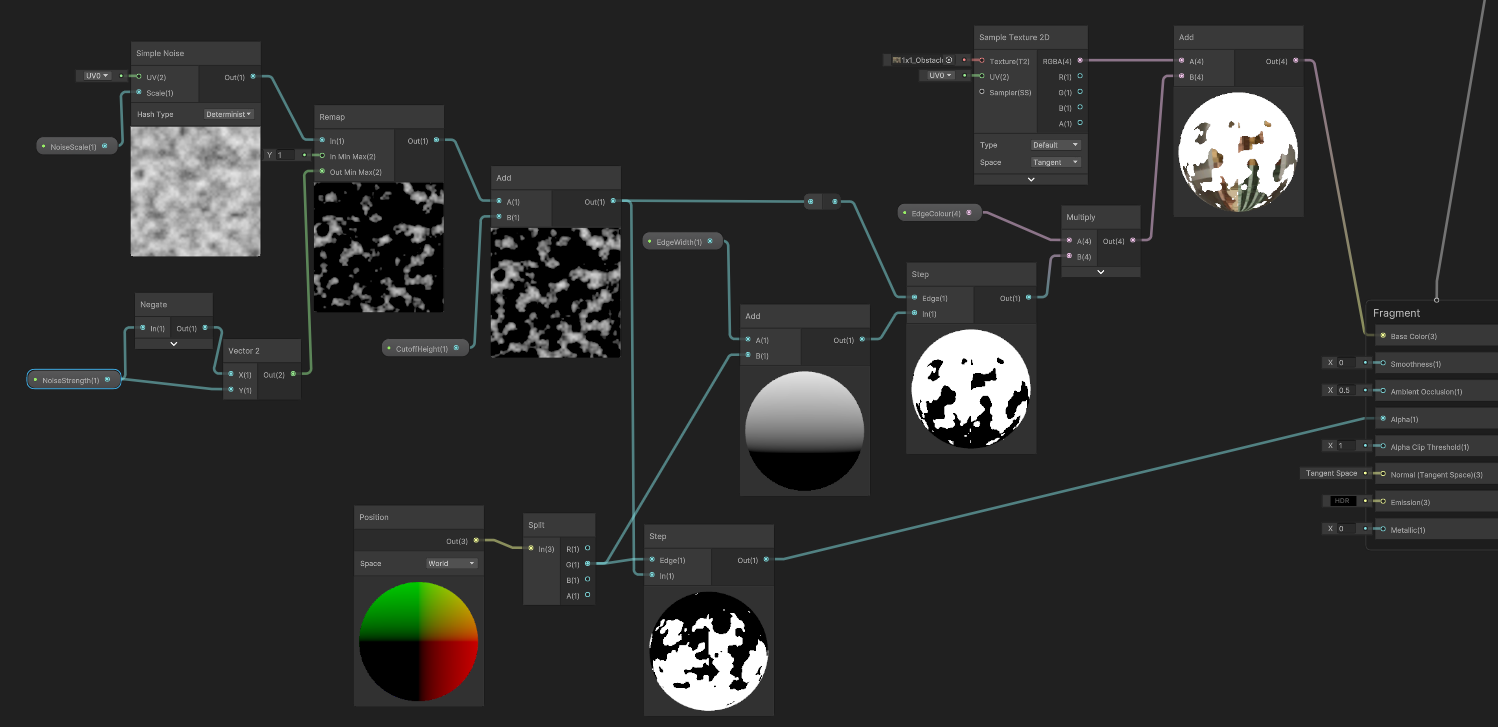
The dissolve appearance was made with a simple noise node which is then remapped with a float property allowing for control over the strength of the dissolve. Next, a float property is added which states the Y position value where the object will start to dissolve. This is also combined with the Y value of a world position node in a step node, which results in pixels above the specified Y cutoff value to be removed. Also included, is a system of nodes that creates a highlight edge between the object and the dissolved pixels. This is created by taking the same Y value from the position node and adding a float property to control the edge width. This is combined with the dissolve noise in a step node and multiplied with a colour property.
Above is a demonstrarion of every part of this working together.
Reflecting on the second sprint, I was able to see noticeable improvements in my skills with shaders. I was also able to use a new tool with VFX graphs and create a portal design that met the needs of the client.
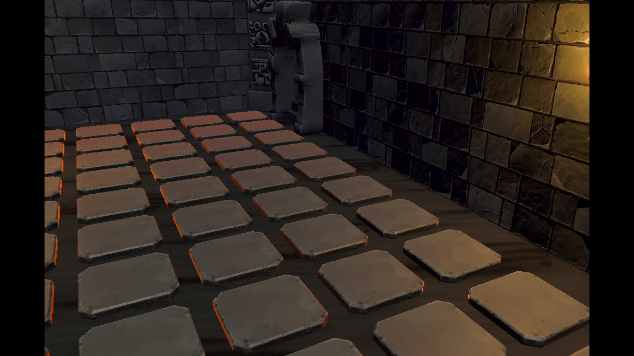
My task for sprint 3 was to create updated visuals for the torch object. I found a video (Jonathan Reite, 2018) of a user demonstrating their torch shader and used it as a reference for the general look I wanted to achieve. I decided on using a particle system to create the torch flame as it included all the necessary features to create the desired outcome.
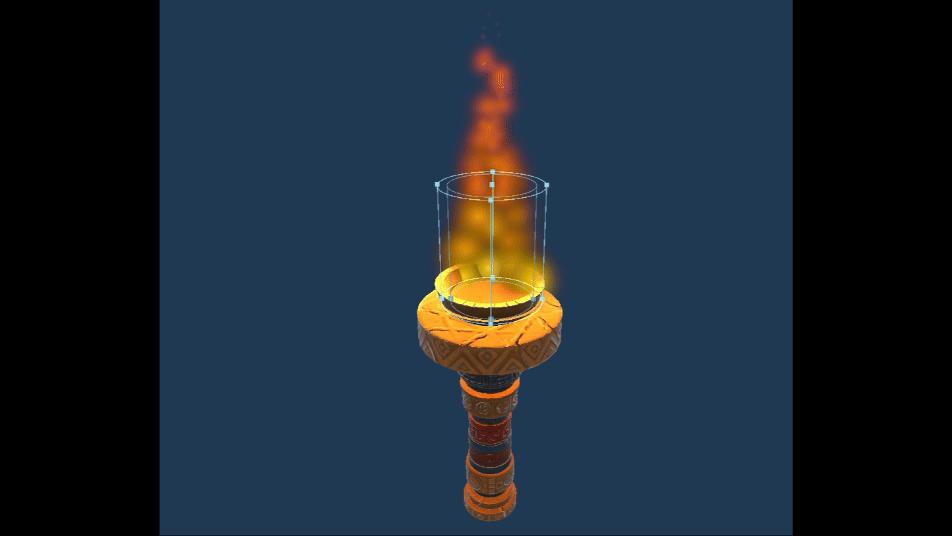
I started by setting up the essentials for the particle system, including size over lifetime to make the particles shrink as they travelled up the flame and colour over lifetime change the colour of the flame from yellow to an orange-red, similar to a typical cartoon flame. I set the emission shape to be a cylinder that fit around the torch flame tray on the top of the mesh. I added some one-directional velocity and reduced the radial velocity value making the particles move inwards towards to the top of the emitter shape.

Next, I created a simple blob texture in Photoshop to change the appearance of the particles. The aim was to achieve a “bubbly” appearance to the flame, and this texture fit very well once applied to the particles.
This task was shorter than the others but was still a beneficial opportunity to develop my skills with particle systems. An issue was found with the particles clipping through the torch mesh, but this was pushed to a later sprint and included in the list of featured that needed polishing.
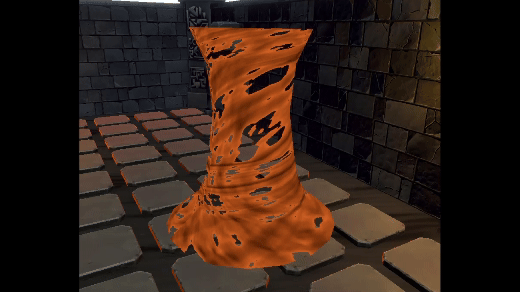
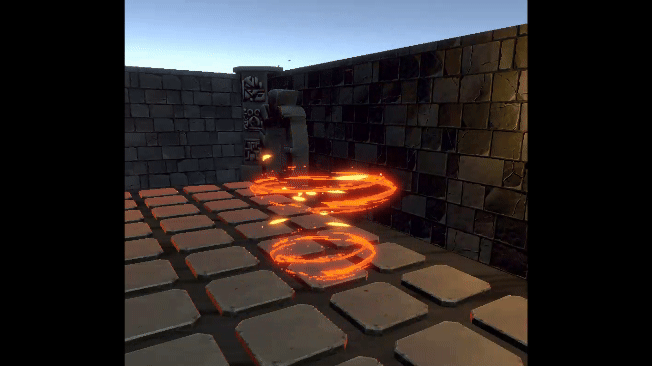
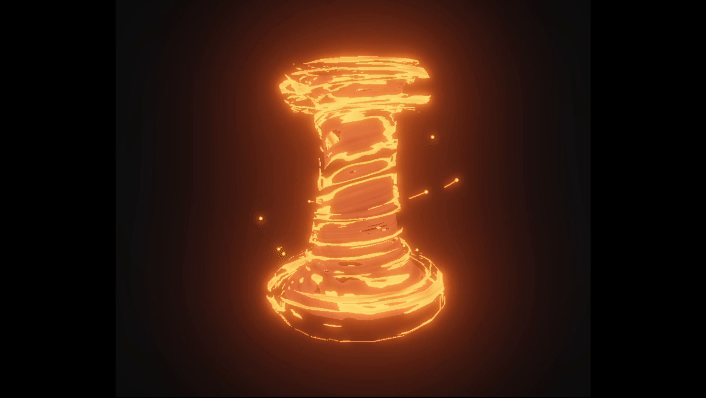
Task four involved creating a set of visual effects for the spawning sequence of the mimic enemy. I had started working on this task in a previous client project, so I already has a head start. The end goal was a dramatic start up fire tornado that would dissipate into a subtle flow of fire effects around the character until they were defeated.
Firstly, I modelled a simple tornado shaped mesh in Blender with a secondary ring mesh that would be used as an extra layer on the tornado, and as the subtle fire flow.
Next, I made a few modifications from the tornado shader I used in my second-year client project.
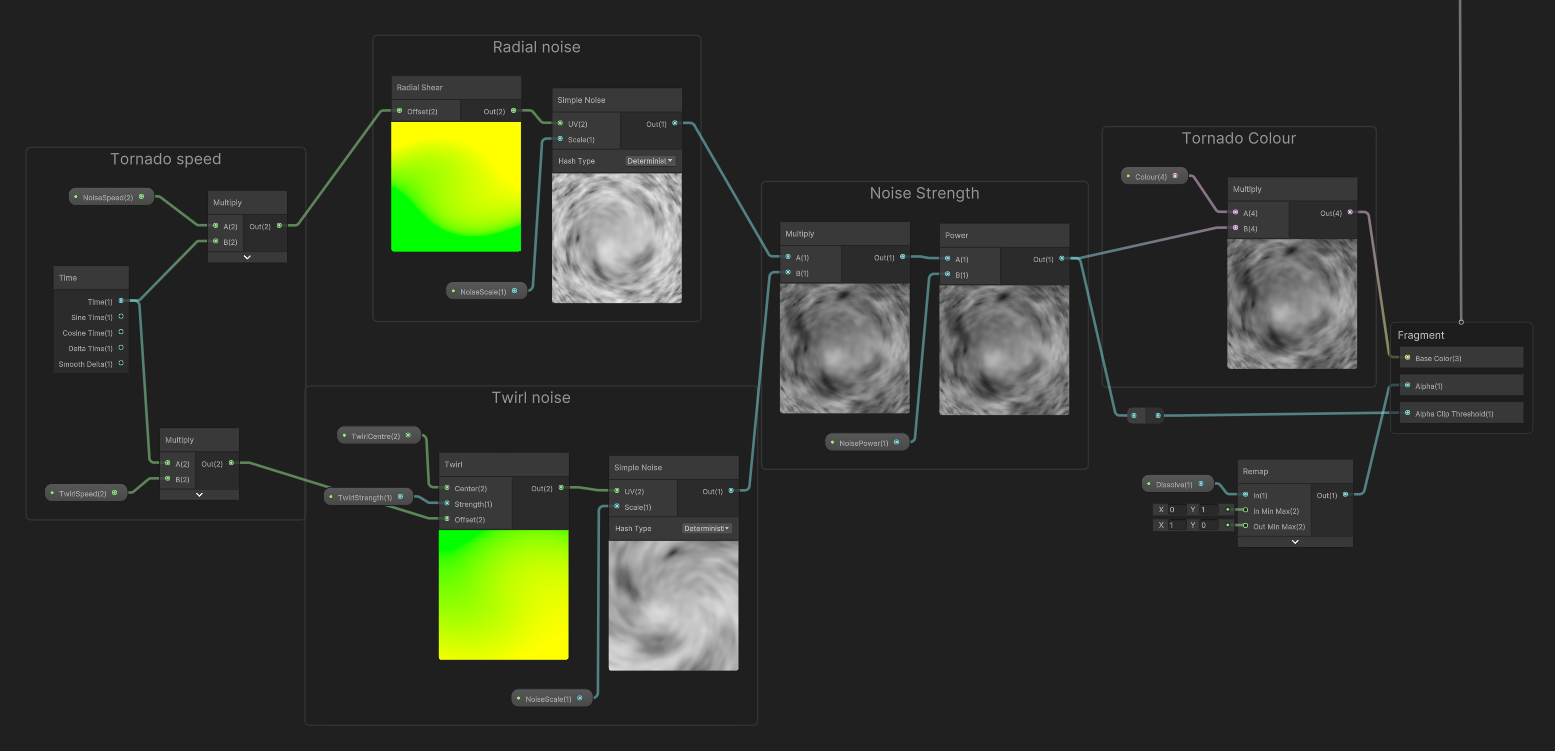
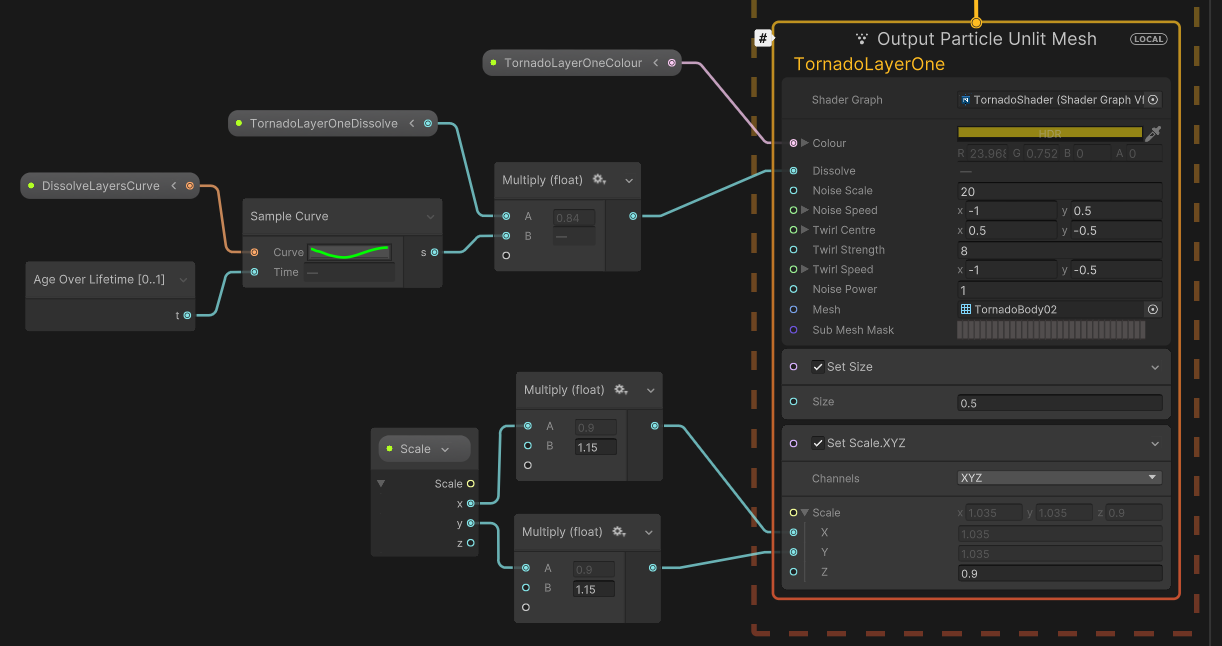
This shader had two layers of simple noise to add more variation in the spiral effect of the tornado. The first uses a twirl UV node to create a simple spiral effect similar to the one used in the portal shader. The second simple noise used a radial shear UV node which slightly distorted the twirl effect and made a cloudier looking material. The strength of the twirl UV was controlled with a float property, and the centre point of the twirl was specified with a vector 2 property. This allowed me to control where the twirl would begin on the tornado. I used a time node to make both noise nodes scroll in a given direction, but this time I used a vector 2 property to control the speed and not a float. This allowed me to control both the horizontal and vertical movement of the noise on the tornado. I then multiplied both noise setups and controlled the strength of the noise output with a float property connected to a power node. This power node is then multiplied with a colour property, allowing me to control the colour of the tornado. Finally, I used a float named dissolve, plugged into a remap node and then connected to the Alpha block node of the graph. This gave me control over how much of the noise would disappear as it scrolled along the tornado.
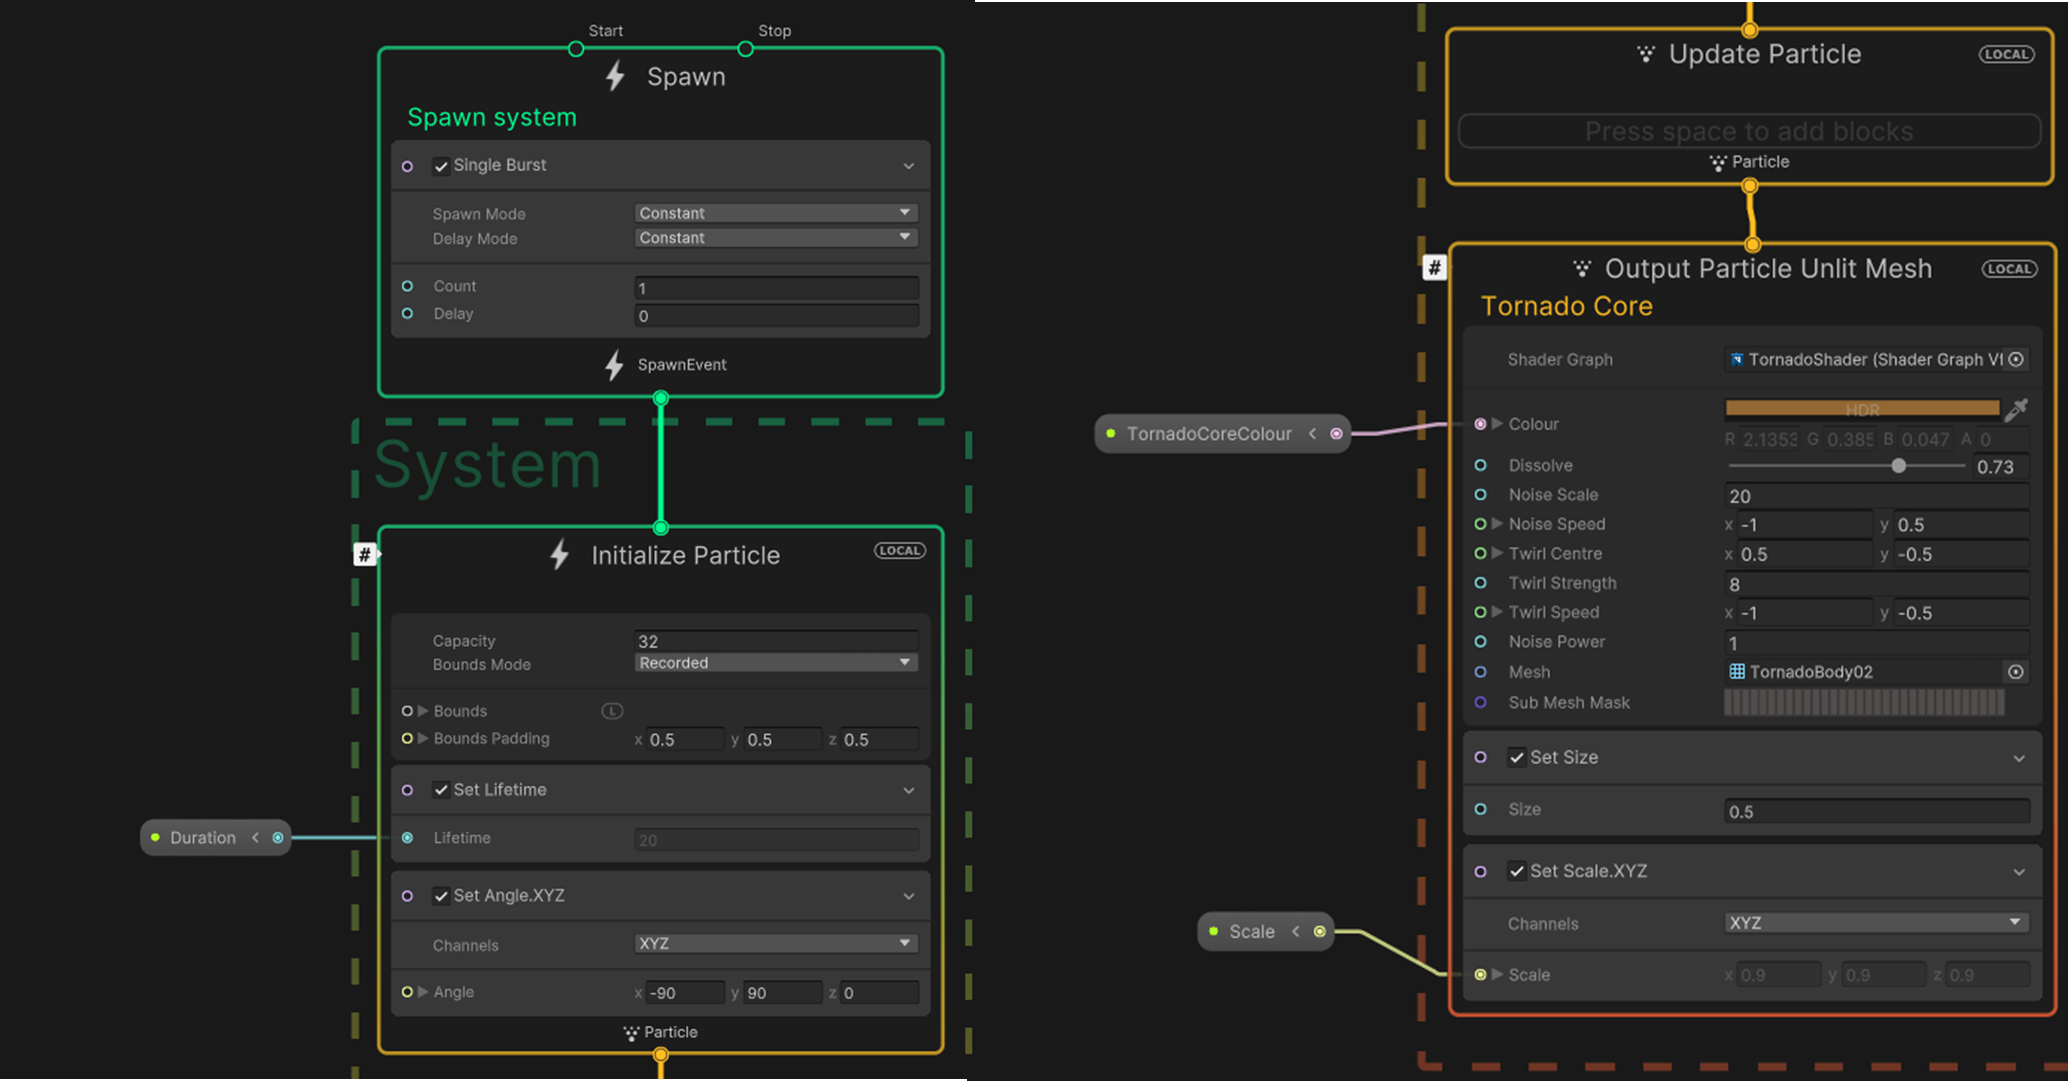
I setup the shader in a single burst VFX graph outputting a particle mesh. This was helpful as I could create extra parameters to control the scale, duration and colour of the tornado.
This VFX needed to have a limited duration and a gradual build up and fade out animation. To achieve this, I used a series of nodes to manipulate the dissolve float value over the effects duration.
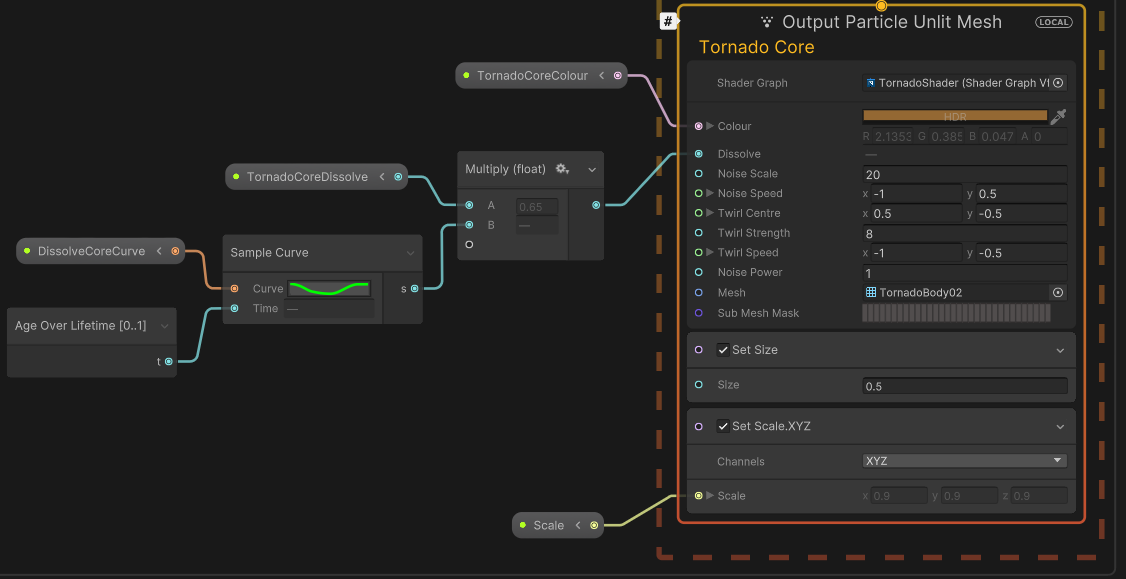
This involved sampling an animation curve with an age over lifetime node, which is then multiplied by a float value which controls the dissolve that appears on the tornado. This allows the animation curve manipulates the dissolve value over the tornado’s duration. In this example, the curve starts with a high dissolve value, which decreases and rises again at the end of the curve. This causes a reverse build-up of dissolve as the tornado begins, which then stays steady for most of the duration before dissolving away at the end of the curve.
The tornado was looking bare, and it needed extra layers. To create these layers, I duplicated the existing VFX particle mesh output system two times.
In each new particle output, I multiplied the X and Y values of the tornado's scale with a number slightly larger than one. This meant that the new layers would show slightly above the centre tornado layer. I also changed the dissolve values so that the noise in the new layers would cover a smaller area. Additionally, I created a new animation curve that included a slower build up when the layers were dissolving in. These two layers were an intense fire orange colour below an outer layer of charcoal black. These colours worked well with each other and created a perfect fire tornado appearance.
I repeated this step two more times, but this time I used the ring mesh I had previously created in Blender, placed at the top and base of the tornado.
These new ring mesh layers used the same animation curve and scaling nodes as the previous layers to match the dissolve timing and appearance.
The secondary stage of this task was to create similar looking idle effects to surround the enemy character as they patrolled the level.
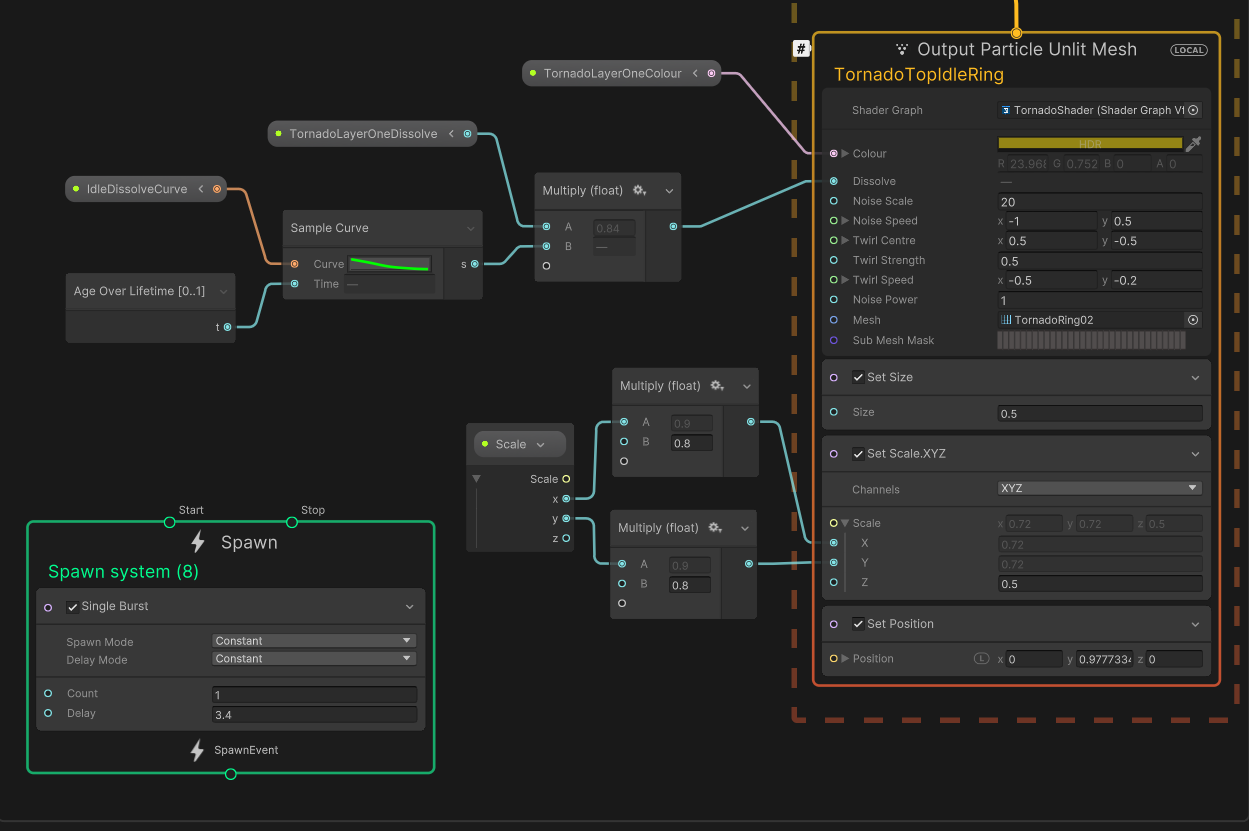
To create this, I used the same particle mesh output system as the tornado ring layers and placed them on a delay to only appear after the tornado cycle had ended. I also used a new animation curve that only included a fade-in effect, as this would stay active until the enemy was defeated.
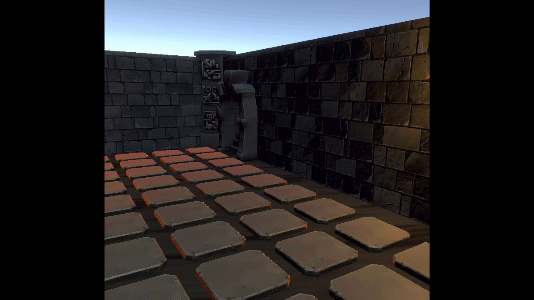
Each ring had a different scale to fit the body shape of the mimic character. These layers also used a higher dissolve value to reduce the amount of visual clutter around the character. I also added some ember particles to the idle effect by creating a particle emission system in the VFX graph.
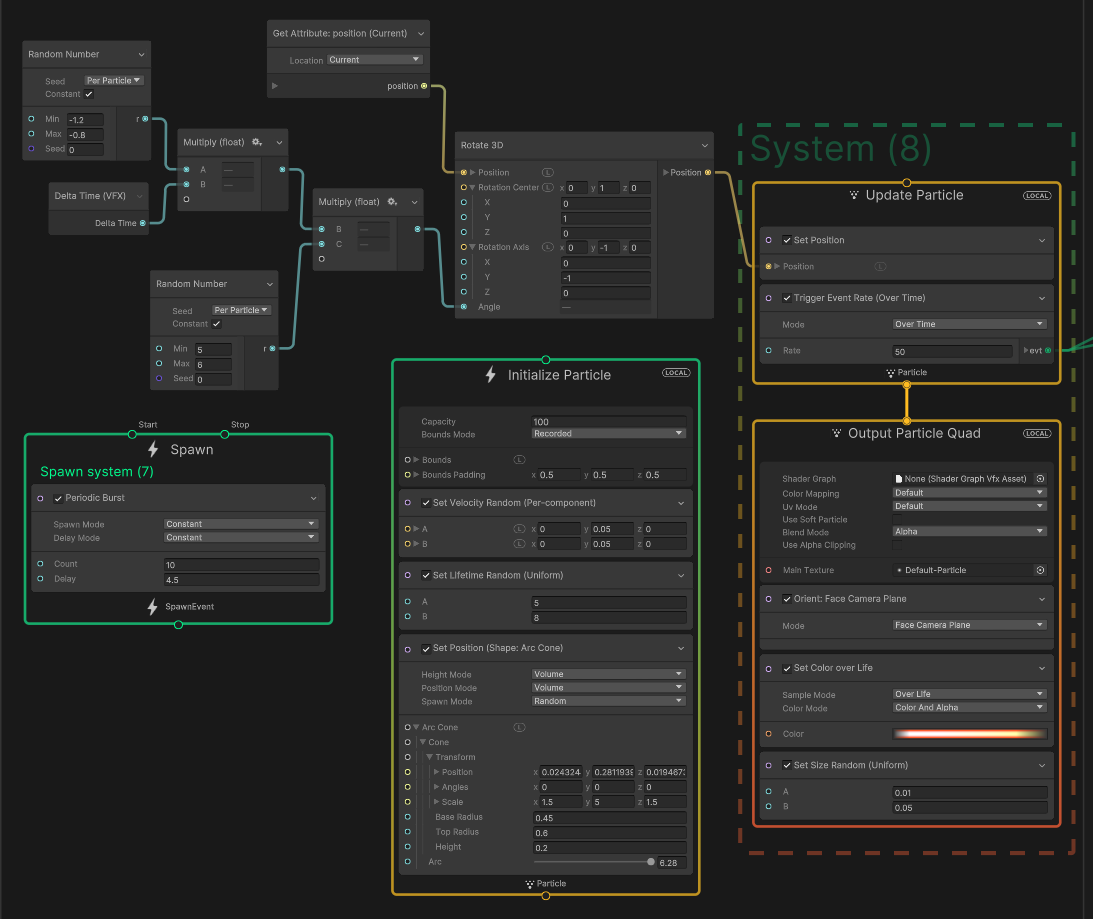
The particles emitted from a periodic burst, and each had a random lifetime so that the transition between bursts was smoother. I used an arc cone as the emitter shade because this followed the generic shape of the character’s body.
I used a similar node setup to the firefly particles from the portal task to make the embers rotate alongside the rings, which included altering the Y rotation axis value in a rotate 3D node. I also multiplied a delta time with a random number twice, giving each particle a different rotation angle.
To create trails that followed the embers, I used a trigger event node that would be active if the particles are alive. This event is connected to two different GPU events that output a particle strip.
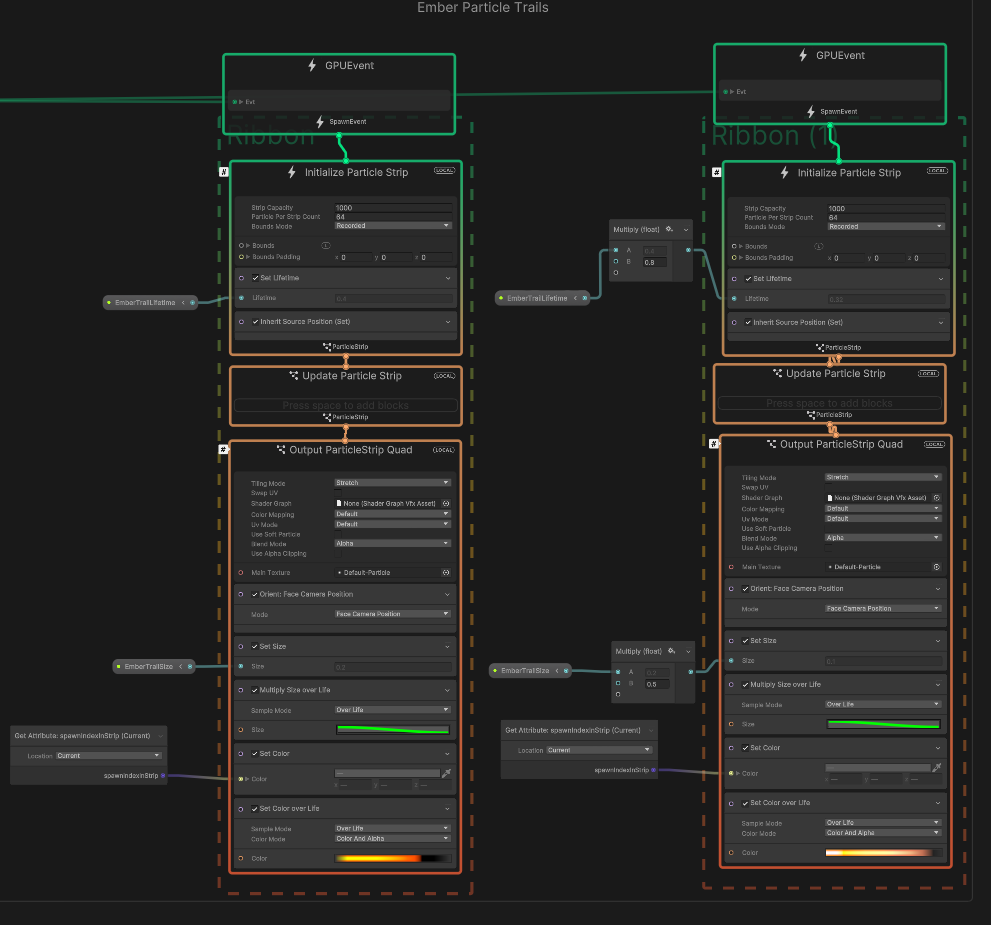
One system served as a back layer on the trail with a longer lifetime and trail size. This included a darker colour gradient that would start with a fire orange colour closer to the particle and fade out to a black colour. The second layer was shorter and smaller and had a more intense fire colour gradient. This resulted in an ember trail with a smaller and more intense flame that followed the particle that faded out to darker fire colours.
The last addition I made was creating additional ember particles to spin around the tornado during its startup animation.
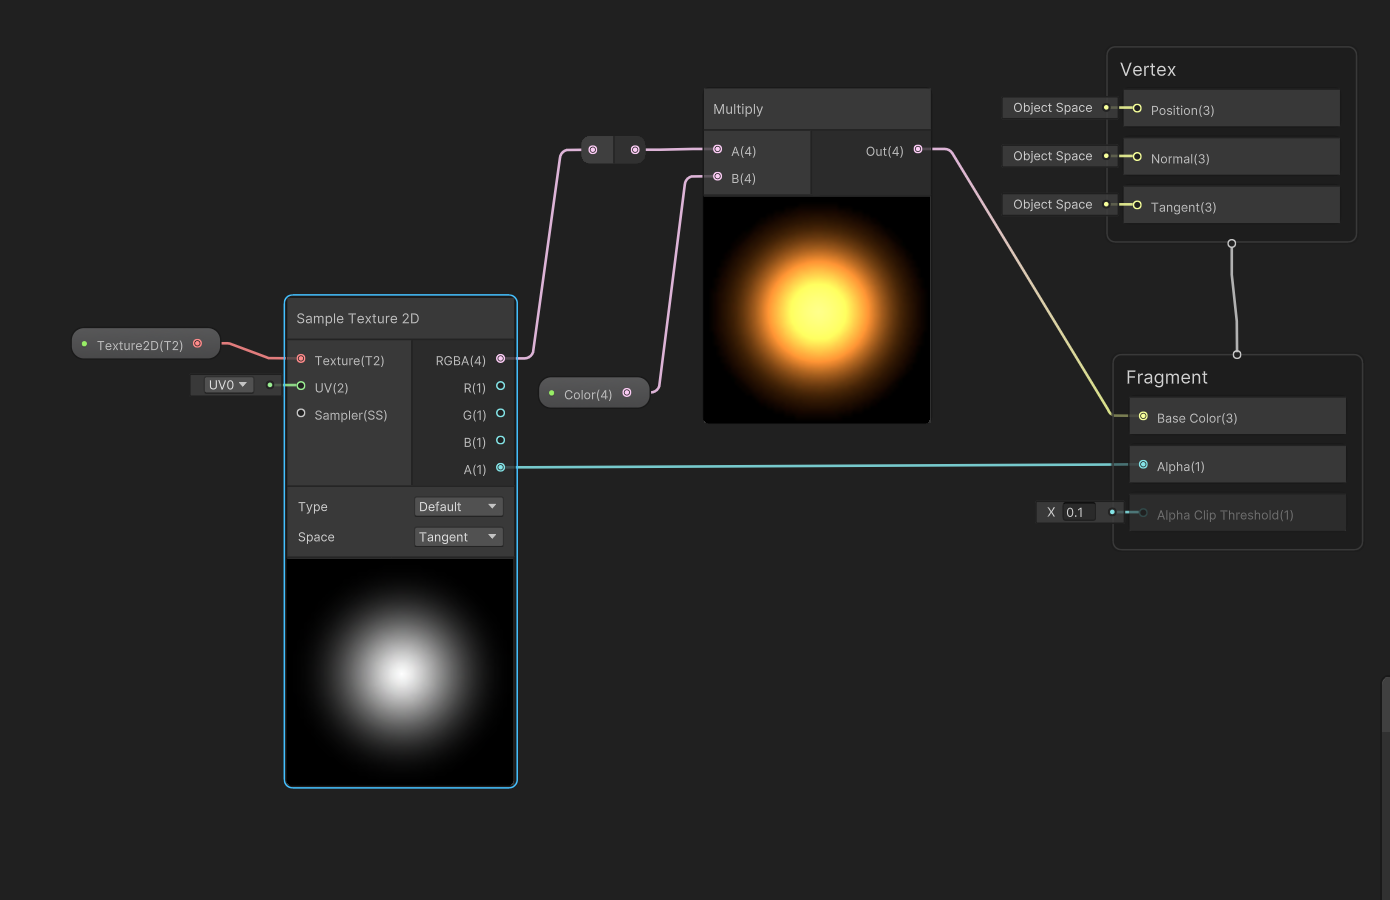
I made a simple shader graph that used Unity's default particle material and multiplied it with a HDR colour with a high intensity.
I attached a new particle system to using the shader as the particle material and matched the duration of the particle system to that of the tornado visual effect. Each particle had a random lifetime and a negative orbital velocity in the Z axis to match the spinning direction of the tornado. The particles also used the size over lifetime feature to slowly shrink as they travelled.
I also used the trails feature in the particles system to create flare trails follow the embers. I used a low lifetime and small width to gain that sharp ended flame appearance.
This was one of the larger tasks where I used a variety of different shaders, particles and visual effects to meet the desired outcome. I believe that I gained a better understanding of more complex visual effects and shaders in this sprint, while also learning more about animating visual effects with animation curves.
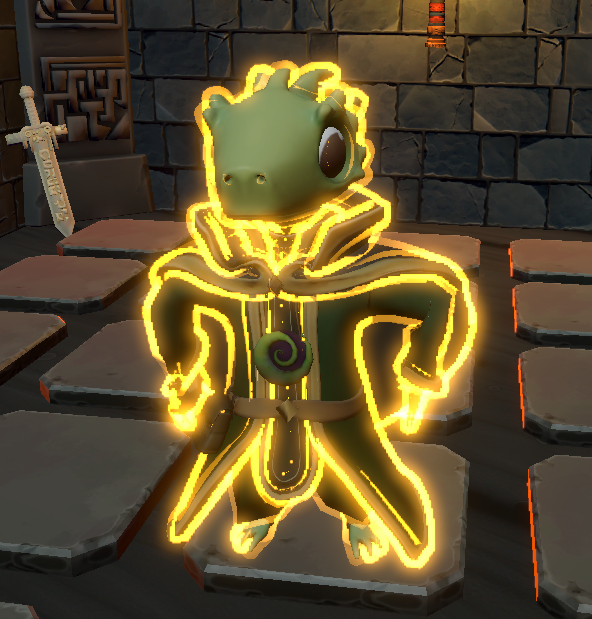
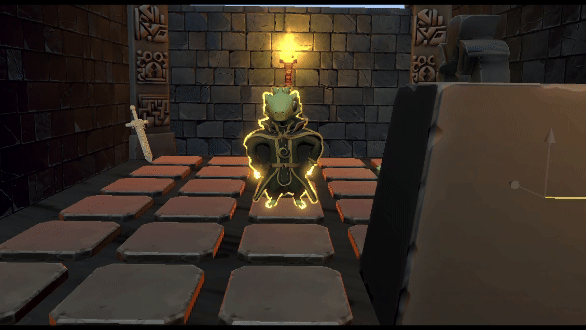
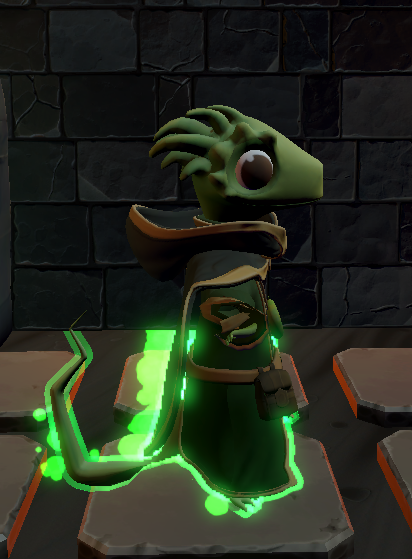
My final task for this project was creating a shader that would give each character a noticeable aura. As the player, you can only move one of the two characters at any time without the tome to connect the two characters. The aim of this shader was to create a visual indicator, showing which characters were selected by the player.
My first attempt involved a transparent shader that used a Fresnel node setup multiplied with a scrolling noise setup, similar to the ones used in the previous tasks. The Fresnel strength was controlled with a power node and then multiplied with a colour property to allow control over the colour of the shader. I wanted to avoid having a visual edge cutoff on the shader, so I used a one minus node connected to a power node and then multiplied this output by node that multiplied the Fresnel and noise together. This created a mask that would remove pixels along the outer edges as well as a large amount in the middle area of the shader.
I applied this shader to a capsule mesh that would follow the characters as they moved. I wasn't completely satisfied with the appearance, so I decided to take a second approach. I used a helpful tutorial on YouTube (MichaelsGameLab, 2024) which detailed how to create an outline using geometry nodes in shader graph.
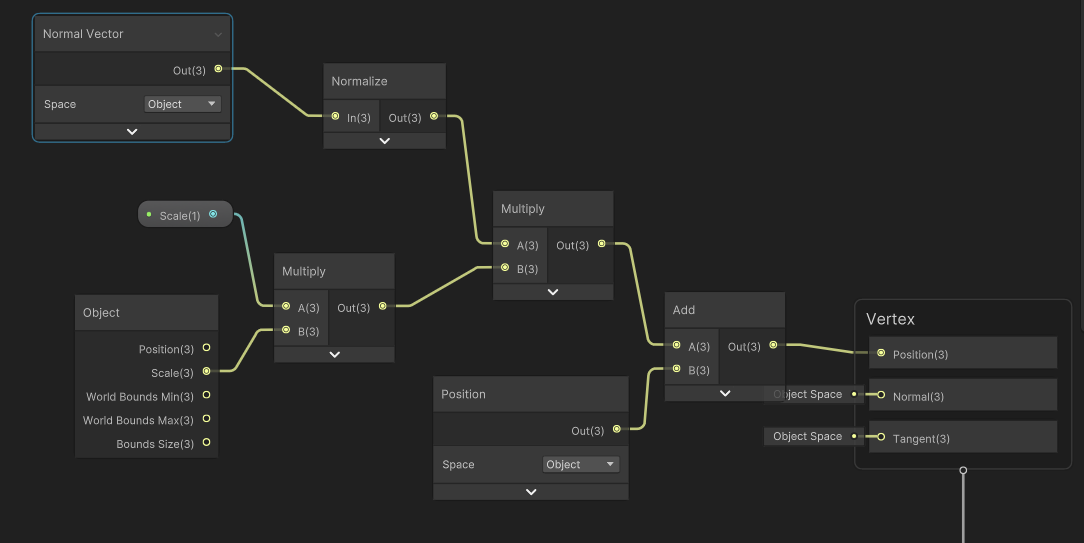
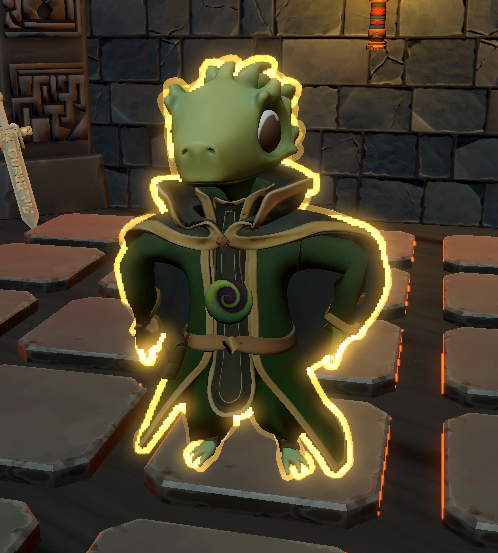
The graph shown above works by taking the object and creating a second version with slightly inflated normal points. This surrounds the smooth edges on an object and provides an outline. I combined this with the Fresnel noise from before and came to the following outcome.
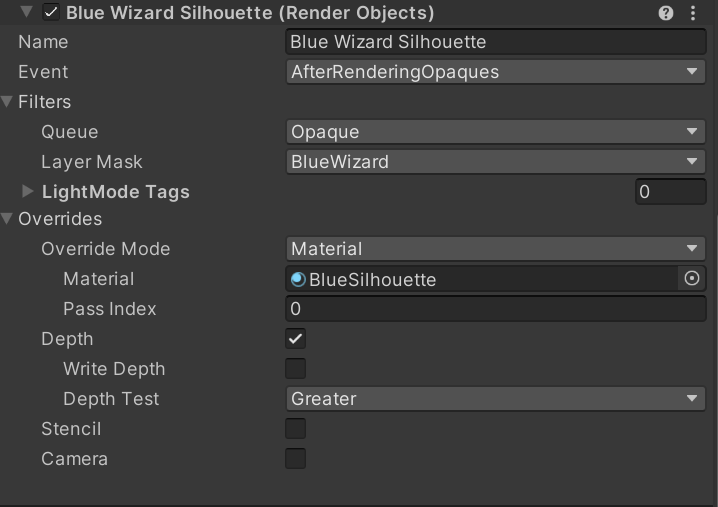
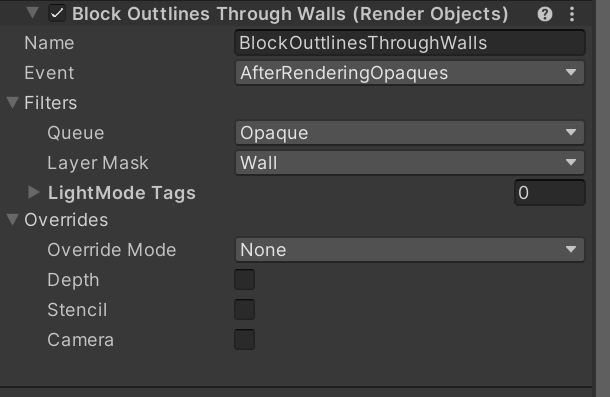
The outlines needed to surround only the outer parts of the character. To achieve this, I created a series of render features in the project's main render asset. For this feature to work, I created a duplicate mesh of the character that holds only the outline shader material, while the original copy kept the character material. I assigned the outline mesh to a new layer named 'Outline' and the characters to layer named 'player'.
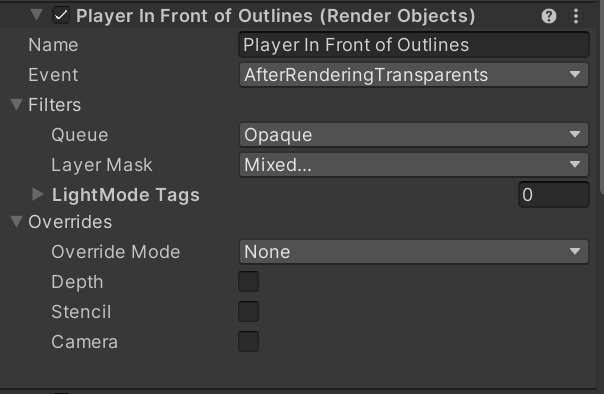
This render feature takes the 'player' layer and renders opaque objects in that layer, which included the characters, after all other transparent objects in the scene had been rendered. Because the outline shader is a transparent material, this allowed the characters to render in front of their outlined counterparts.
However, this caused the characters to show through other opaque objects in the scene. The concept of this issue is something that the client wanted from this feature, but instead of the full character showing through objects, only the outline should show.
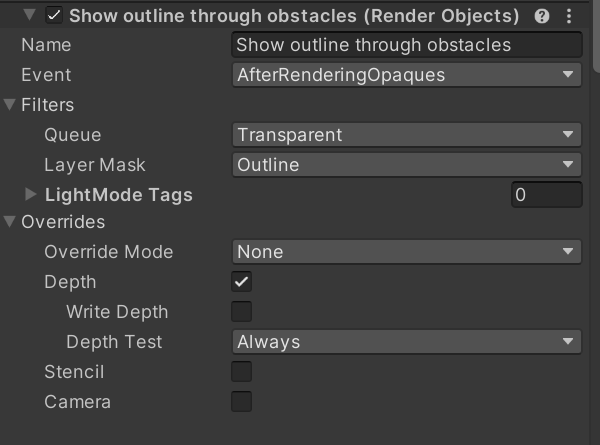
This first render feature allows the outlined character meshes to be shown, even when behind other objects in the scene.
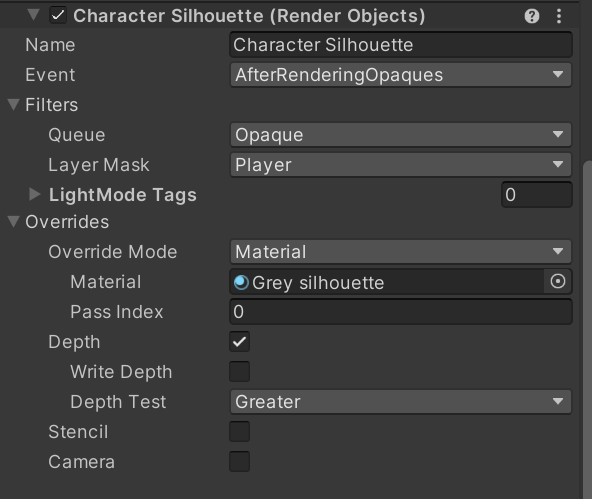
This next render feature takes the same concept of rendering the player layer above opaques, but this time overriding the character material with a new material when they are behind an opaque object. Due to the outline shader being a back-face rendered material, using a transparent override material would show the back face of the outline material that was previously being hidden by the character. To compromise, I used an unlit grey material. Many objects in the scene were grey obstacles, so this material could fake a transparency effect, but it would become more obvious in areas where there is more lighting.
The next step was to add more life to the selection outlines. I created a simple particle system, using the same texture I had made for the torch particles.
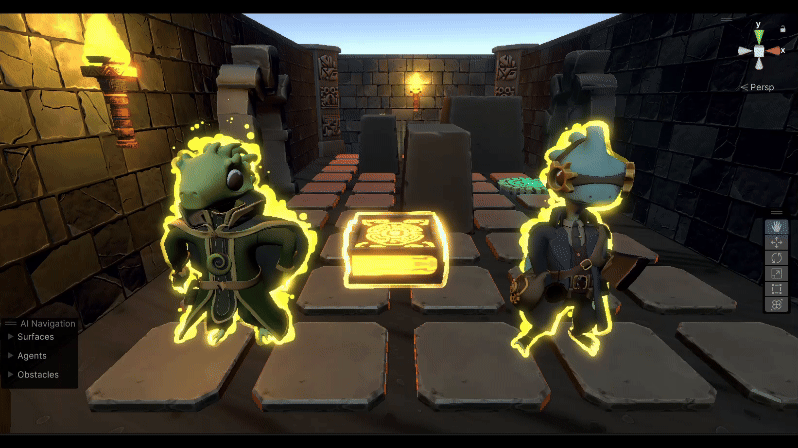
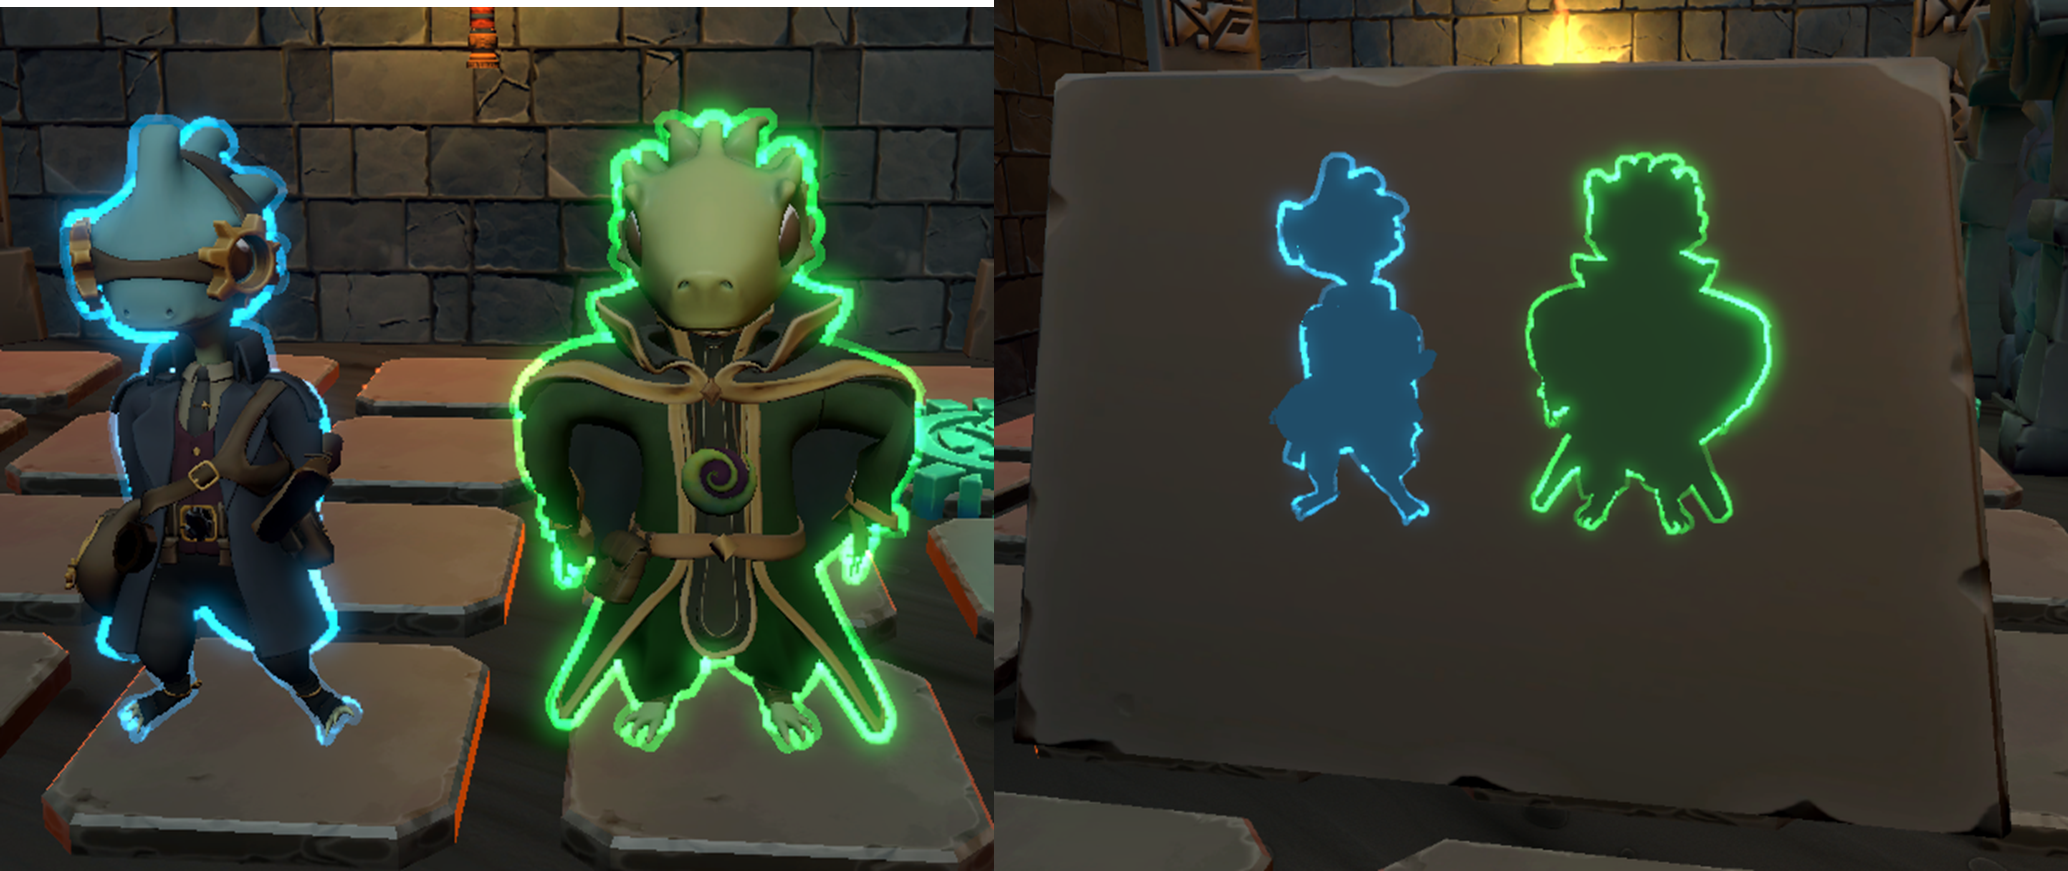
I assigned the particles to emit from the outlined meshes and placed them on the same 'outline' layer so they could render behind the characters. I created a design that had negative gravity and another with no gravity and presented this during a weekly meeting to the client to gain feedback. The client stated that the design with no gravity was preferred so I kept that one going forward. We also spoke about how the fake transparency compromise could be turned into a better feature. It was concluded that each character would have a unique set of outlines, particles and silhouette override materials with colours that would match the corresponding characters aesthetic. To achieve this, I made each character have their own unique render layer and used the previous render feature that overrides the base character material with a silhouette material when behind an opaque object.
I assigned each character and their layer to a new render feature that would override the base character material with a coloured silhouette when they are being viewed behind an opaque object. The silhouette materials were simple unlit materials each with a unique colour that matched their respective character. I also changed the colour of each character's outline mesh and particle system to match the characters appearance.

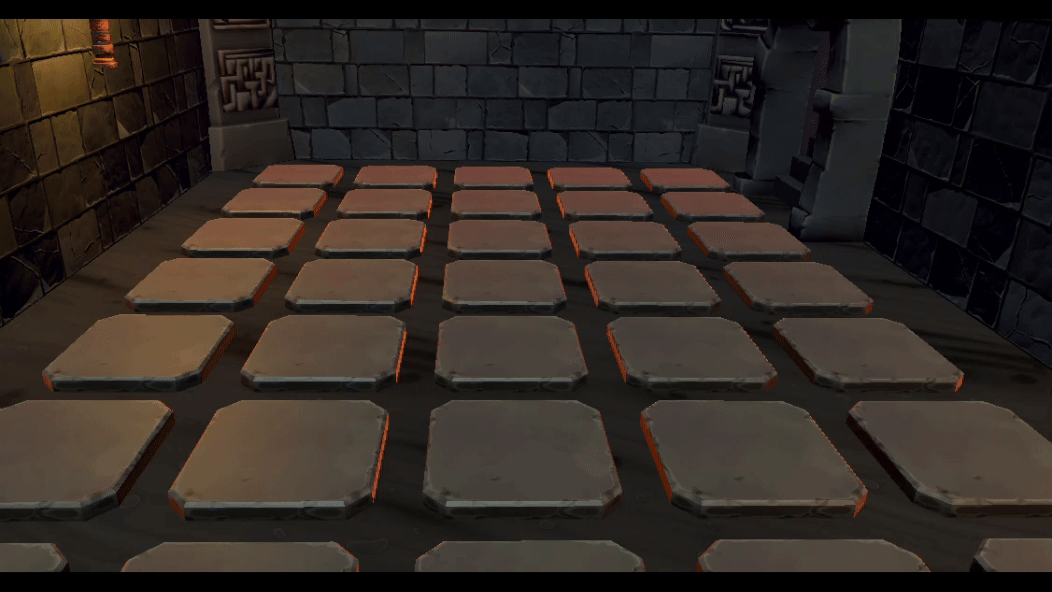
There was one last issue with the render queues that I had to tackle. The silhouette override materials would activate when viewing a character behind any object in the scene. Each level contained three floors, each with a different puzzle to solve, and a set of walls to divide each floor. The client stated that the walls in each floor needed to block the silhouettes from rendering so the characters could not be seen when the player is viewing a different floor.
I attempted to solve this issue by assigning a new layer named 'wall' to the wall assets in the level. Next, I created a render feature that would render the walls above all other opaques. This worked initially as the render feature that controlled the silhouette override materials had a depth test of greater, meaning the characters would render on top if they are closer to the camera than the walls.
However, when viewing a character against a wall, the outlined mesh would start to disappear. This is because the outline material is transparent and the render feature is rendering the walls above opaque objects, which also means they render above transparent objects, because transparent objects are rendered sooner in the event render queue than opaque objects.
The perspective of the in-game camera being primarily a top-down view, meant that this issue was rarely seen during gameplay. During our last sprint meeting, I discussed the issue with the client, and it was suggested that a new script was needed that would render the different character, outline and wall layers and render them based on their distance from the camera. This task was pushed to future polishing and my work on this project was complete.
Despite the problem that occurred at the end of this sprint, I was able to reach the deadline with a product that met the requirements of the brief and satisfied the client. I gained a better understanding of different nodes in shader graph and found new knowledge on how to manipulate the render order of different objects by using different features in Unity’s renderer assets.
This project has been a beneficial opportunity to explore new areas of game design and expand my skillset. I am particularly pleased with the quality of work I have produced during this project, and I consider it to be some of my best. I started this project with little knowledge, experience and interest in shaders and visual effects in Unity but have seen significant improvements with each task and have developed a new interest in these areas, which I plan to incorporate in future projects. The management of this project including sprints and dedicated work times, has helped me stay on track with deadlines. I have seen noticeable improvements with my time management, which is one of my weaker skills that I constantly aim to develop. Moving forward, I intend to expand my game design skillset further and explore different and interesting ways to create great designs.